
Did you know it’s possible to knit a rib pattern without purling any stitches? It’s possible with the Cartridge Belt Rib stitch pattern which involves knitting and slipping stitches to create the rib pattern (no purling needed!).
Here’s how to work Cartridge Belt Rib:
- Cast on a multiple of 4+3 stitches.
- Right-side rows: K3, *sl1 wyif, k3; rep from * to end.
- Wrong-side rows: K1, *sl1 wyif, k3; rep from * to last 2 sts, sl1 wyif, k1.
- Repeat these two rows for the length of the project.
- Bind off on a right-side row in K3P1 rib.
While that’s a quick look at the basic instructions, there’s more to learn about this stitch pattern. Let’s take a closer look at the pattern, how to properly slip the stitches, where to hold the yarn, and how to bind off and maintain the pattern.
Understanding Cartridge Belt Rib
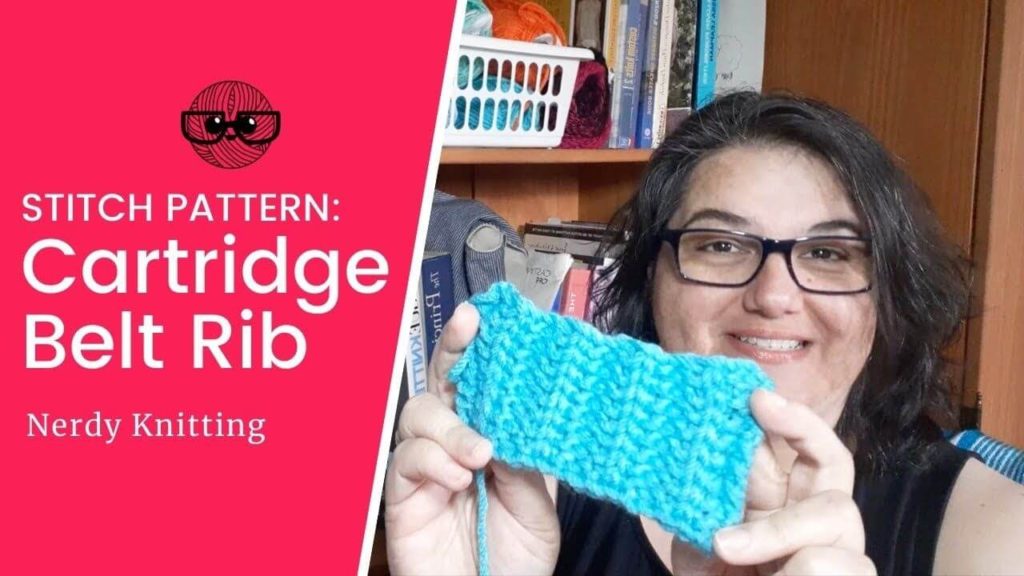
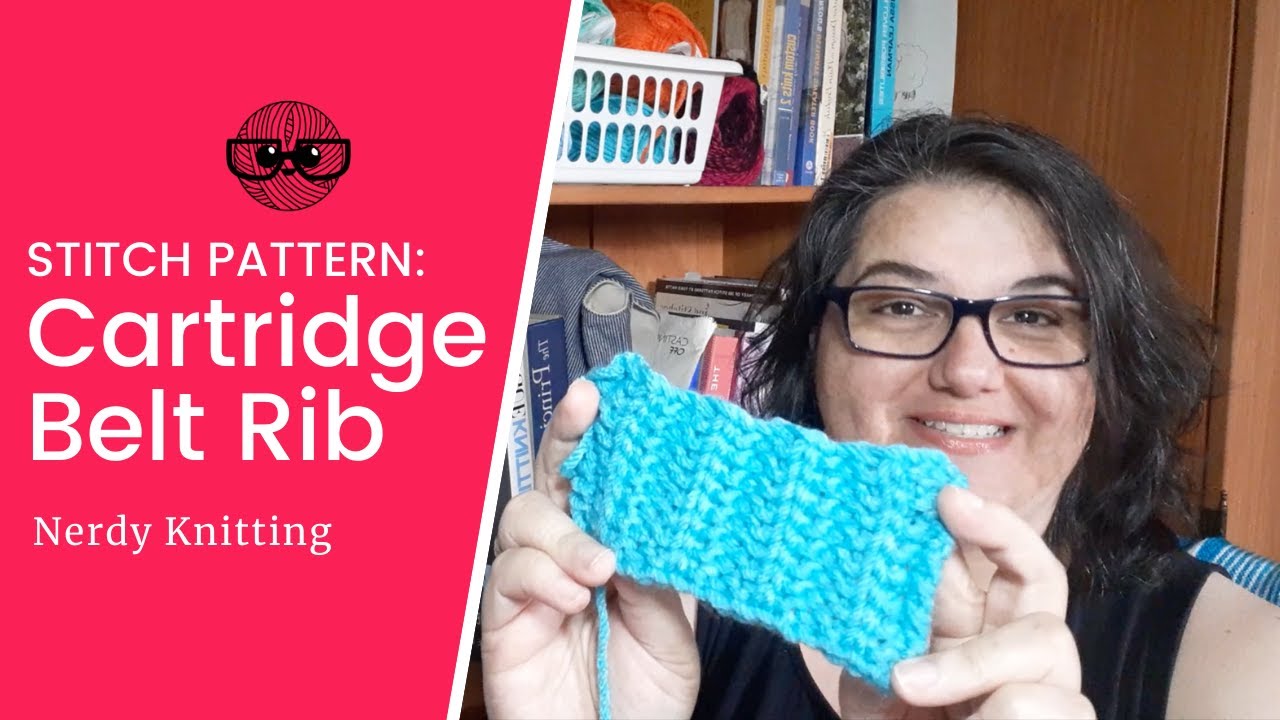
Cartridge Belt Rib is also called the ‘false rib stitch’, most likely because while it looks and acts like a knit rib pattern, there are no purl stitches involved.
This easy pattern is a completely reversible fabric that lies flat so it’s perfect for blankets, scarves, and wraps where you want both sides to look nice.
While the pattern is quite simple – just a pattern of alternating knit stitches with slipped stitches – those slipped stitches create the columns of pronounced knits with textured background stitches (which is actually Garter stitch – since you’re knitting every row).

Slipping Stitches Purlwise
The most important component of this pattern is the slipped stitches. If they are worked incorrectly, the pattern will not work up properly. There are two steps to properly slipping the stitches for Cartridge Belt Rib – slipping the stitches purlwise and bringing the yarn to the front of the work while the stitches are slipped.
The first step involves the placement of the yarn. Before you slip stitches in this pattern, the yarn must be brought to the front of the work. This does not refer to the right-side and wrong-side rows; instead, this refers to the location of the yarn, the project, and you.
When a pattern tells you to hold or bring the yarn to the front, it refers to the side of the project that is facing you (even if the side that is facing you is the wrong side).
Once you’ve brought the yarn to the front (between the needles – be careful not to bring the yarn over the right or left needle), it’s time to slip the stitch.

The second step is slipping the stitches properly – they should be slipped purlwise. How do you do that? Simply insert the right needle into the first stitch on the left needle like you are going to purl the stitch (inserting into the right leg of the stitch from right to left). Instead of purling this stitch, slip it from the left needle to the right needle, leaving it unworked.
Slipping a stitch like this slightly elongates that particular stitch (and, in this pattern, produces those columns of pronounced knit stitches).
Once you’ve slipped the stitch, move the yarn to the back of the work (between the needles) and knit the next three stitches.
Now that you understand the two essential elements of this pattern, let’s look at how the stitch pattern is worked.
Cartridge Belt Rib Pattern Instructions
The pattern can be worked over any multiple of 4 stitches plus 3 stitches. The three stitches are used to balance the right and left edges of the pattern – so they look the same – and keeps you from working a slipped stitch right along the edge of the fabric.
Once you’ve cast on your stitches, the pattern itself is a simple 2-row repeat.
On Row 1 (and all the right-side rows): Knit three stitches and slip one stitch purlwise with the yarn held to the front of the work. Repeat these two steps for the pattern until you reach the last three stitches (those balancing stitches) and knit these final three stitches.
On Row 2 (and all the wrong-side rows): Knit one stitch. Then continue the pattern from the previous row – slip one stitch purlwise with the yarn held to the front of the work and then knit three stitches – until there are two stitches remaining. Slip one more stitch purlwise with the yarn held to the front of the work and knit the final stitch.
You’ll notice as you continue to work the pattern, that alternating the placement of the slipped stitches gives the fabric the resemblance of a squishy K1P2. This happens because the stitches are slipped in different places. On the wrong-side rows, the stitch that is slipped is in the center of the ‘knit three’ section of the right-side rows. The small yarn floats that happen from slipping the stitches are also hidden in the textured, Garter stitch background.
It’s really a remarkable, interesting pattern that produces a wonderful, textured fabric. If you want a printable copy (along with a chart) fill out the form below and the PDF instructions will be sent directly to your inbox.
Enter your email address below to get the FREE STITCH PATTERN INSTRUCTIONS.

You’ll also be subscribed to Tonia Knits. You’ll receive practical tips and advice so you can create beautiful, hand-knit garments and become a confident, adventurous knitter.
Binding off Cartridge Belt Rib
While at first glance it might seem difficult to bind off this pattern, it’s actually fairly easy. You won’t be slipping any stitches. Instead, you’ll bind off in pattern. All that means is that as you bind off, you work the stitches in the pattern established, which in this case, is K3P1 rib.
After finishing a wrong-side row and you’ve turned your work and are ready to start binding off on the right-side row:
- Knit the first two stitches.
- Insert the left needle into the leg of the first stitch on the right needle and bring it up and over the second stitch on the right needle (that is one stitch bound off). See images below.
- Knit the next stitch and bind off another stitch.
- The next stitch is the stitch that was slipped – this time you will purl that stitch.
- Bind off another stitch.
- Continue binding off in pattern – knitting three and purling one stitch. If you find it hard to keep track, just remember to purl the stitches that were slipped on the previous row.


Cartridge Belt Rib Video Tutorial
If you prefer a video tutorial, this video walks you through exactly how to work both rows of the pattern and how to bind off and maintain the pattern.
Patterns that feature cartridge belt rib
If you’re curious to see this pattern in a few projects, these patterns show how versatile the Cartridge Belt Rib stitch pattern can be – use it for scarves, sweaters, mittens – to name just a few ways this pattern can be adapted. It’s a wonderful stitch pattern for projects that are knit flat (since it’s reversible) and produces a wonderful textured, squishy fabric.
No-Purl Ribbed Scarf
The No-Purl Ribbed Scarf from Purl Soho demonstrates Cartridge Belt Rib in its simplest form – worked back and forth in a flat project. This pattern is so popular that the created alternative options: a No-Purl Ribbed Blanket and a No-Purl Ribbed Wrap.
Get the pattern: No-Purl Ribbed Scarf

Bright River Sweater
The Bright River sweater from Andrea Rangel showcases this pattern worked in the round (note, Cartridge Belt Rib worked in the round includes purl stitches to create the pattern – so it does lose some of that ‘no purl’ stitch appeal). It’s worked seamlessly from the bottom up with raglan sleeve shaping and a draping cowl neck.
Get the pattern: Bright River Sweater (available on Amazon)
1979 Cardigan Vest
1979 Cardigan Vest from Elizabeth Smith Knits is a cute, oversized vest with a contrasting trim and pockets. It’s worked in bottom-up in one piece and uses a three-needle bind-off for the shoulder seams.
Get the pattern: 1979 Cardigan Vest

Cartridge Rib Fingerless Gloves
The fingerless gloves feature a cuff worked in Cartridge Rib and a reverse Stockinette hand and thumb. It’s worked in the round (so purling is involved). What makes this pattern interesting is that a short row is worked so you are knitting the body of the mitten instead of having to purl every row.
Get the pattern: Cartridge Rib Fingerless Gloves
Common Knitting Questions for Cartridge Belt Rib
These questions are one that I commonly see that relate to this stitch pattern – and I have some answers for you!
Can this be knit flat on circular needles?
You can knit Cartridge Belt Rib flat using circular needles. Instead of joining to work in the round, when you reach the end of a row, turn your work and begin knitting in the other direction. Using circular needles to knit flat projects is a common way to use them. The cord of the circular needles holds the weight of the project in your lap, giving your arms and wrists a break.
Can I change the number of stitches I cast on to make a larger or smaller project?
It’s easy to change the stitch count for this pattern. The multiple is 4+3 which means it’s a 4 stitch repeat with an additional 3 stitches to balance the edges (so the right and left sides look the same). To change the stitch count – choose a multiple of 4 and add 3 stitches.
Does this pattern lay flat?
Cartridge Belt Rib lays flat – there is no curling at the edges. The finished fabric resembles a textured K1P2 rib.
Can Cartridge Belt Rib be worked in the round?
While it can be worked in the round, the benefit of this pattern is the ‘no purling’ aspect which would be lost if you worked the pattern in the round. If you want to work the pattern in the round, here are the instructions:
- Cast on a multiple of four stitches.
- Round 1 (and all odd-numbered rounds): Knit three stitches, slip one stitch purlwise with yarn held to the front of the work. Repeat these two steps to the end of the round.
- Round 2 (and all even-numbered rounds): Purl one stitch, *slip one stitch purlwise with yarn held to the BACK of the work, purl three stitches. Repeat from the * to the last three stitches. Slip one more stitch purlwise with yarn held to the back of the work and purl the final two stitches.
Pay attention to what’s happening while you’re working in the round. On the even rows, you’re producing a column of knit stitches on the front of the fabric – be sure to hold the yarn to the back of the work as you slip these stitches. On the odd rows, you can’t see the prominent column of knit stitches because they’ll be on the inside of the work. Just remember that the slipped stitch is centered between the columns of knit stitches that you can see on the front of the work (and you need to hold the yarn to the front, towards you, to maintain that column of stitches on the inside).
More knitting tips and techniques:
- A Beginner’s Guide to Yarn Substitution
- Knitting on a Budget: 20+ Money-Saving Tips
- Knitting Tutorials & Articles