When you find a beautiful knitting pattern that you are just so excited to try and then, after looking at the materials, you realize that the yarn is discontinued or it’s not available locally, there is such a feeling of disappointment. But you don’t need to be disappointed – it’s a very simple, four-step process to find a suitable yarn substitute.
Here are the basic steps to yarn substitution for a knitting pattern:
- Look at the gauge information and/or the Craft Yarn Council standard weight system.
- Select a yarn with similar fiber content.
- Look at the structure of the yarn.
- Compare the put-up of each yarn (the ratio of weight to yardage).
Let’s look at these four steps in detail. You can scroll through or use the links in the Table of Contents.
Some links below are affiliate links (which means I may make a small commission at no extra charge to you when you click through and make a purchase). See the disclosure policy for more information.
Step one: Gauge Information
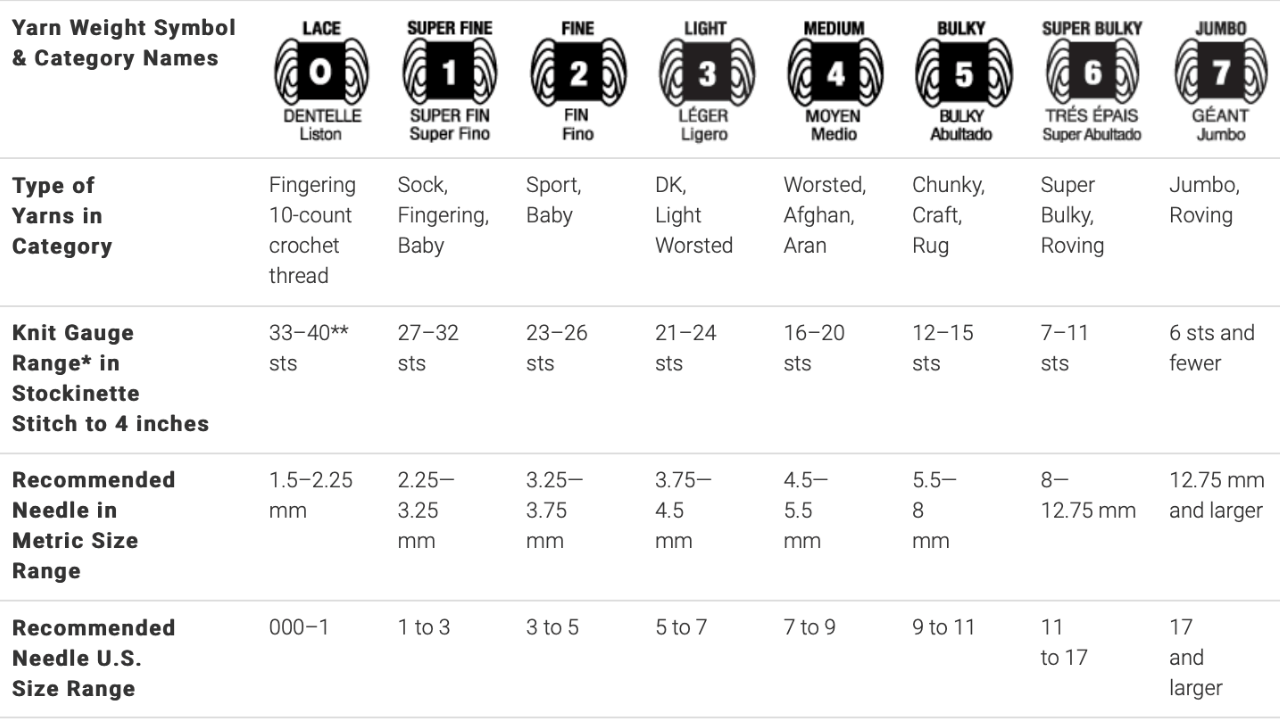
The first step in finding a proper yarn substitute for your knitting pattern is selecting one that falls within the same weight category (see the Craft Yarn Council Standards) or, if your yarn does not have the Craft Yarn Council standard symbols, make sure it has the same gauge (the stitches and rows to one inch or four inches are generally listed on yarn labels) – listed in the third row of the chart below.
The yarn ‘weight’ doesn’t refer to the actual weight of the skein. Instead, it refers to the thickness of one strand – from very fine, lace-weight yarn, to extra chunky yarn (row 1 of the chart). Each weight can have different types of yarn that fall within that category (row 2 of the chart below) and knits to varying gauges as well (row 3).
Look at the sample yarn used in your pattern and find out which category it fits into (remember, if the yarn doesn’t include the symbol or category name, you can look at the gauge information to figure out which category it should be in). Once you know the weight category and gauge information, look for a substitute yarn that falls within the same category for the best outcome for your final project.

Step two: Fiber Content
The second thing to consider is the fiber content. For the best possible outcome, you should select a substitute yarn that has the same or very similar fiber content to the sample yarn. Different fibers act in different manners and bring different attributes to a pattern and, unless you are fully aware of how these various fibers can affect a finished garment, it’s best to choose a substitute that has the same fiber content.
For example, if I wanted to substitute Cascade 220, which is 100% Peruvian Highland Wool, I could look through my yarn stash for some substitutes. My possible substitutes both fit the same gauge and weight category, Dishie and Wool of the Andes are 100% cotton (Dishie) and 100% Peruvian Highland Wool (Wool of the Andes). But, since I need to take the fiber content into consideration, I know that Wool of the Andes would be a much better substitute than Dishie.
Learn more about fiber content:
Step three: Yarn Construction
The next thing to consider is how the yarn is spun and plied. The construction of the yarn greatly impacts how the final project will look. A lightly woolen spun yarn will provide a lightweight, warm sweater with a slightly fuzzy appearance. A tightly spun three-ply yarn will make a sweater with fabulous stitch definition (something you want for your highly textured cable knits!).
Woolen vs Worsted Spun
When the fleece or fiber is in its initial preparation phase, the fibers are washed and prepped. They can be ‘carded’ which creates a wooly mass of fibers and then they are spun. This is known as a woolen spun yarn which produces a fuzzy, lightweight yarn that will trap heat and keep you very warm.
Fibers can also be ‘combed’ which lines all the fibers up into nice neat sections before spinning the fibers using a worsted spinning method. This produces a smooth yarn that is more dense than it’s woolen-spun counterpart.
Singles, 2-Ply, and 3-Ply Yarns
Once the fibers are spun into singles they can be plied – 2-ply, 3-ply, or even more. A single-ply is also a possible yarn option. Each of these will also affect how the finished project will look. A single-ply will be very loose but very warm since it can trap more air within the fibers. A 2-ply will appear flat while a 3+ ply will be round. 2-ply yarns are suitable for lace projects and colorwork when you want the yarns to stick together and create a cohesive piece (and will also be warm like a single). A 3+ ply will have great stitch definition for textured projects. Multiple plies are also much more durable and less likely to pill.
A chainette yarn (as well as cords and cable-plied yarns) are another useful yarn construction. The chainette looks like a small I-cord which is very lightweight and elastic. It’s perfect for fibers that are usually very heavy and inelastic (light plant fibers). The structure of the chainette yarn adds some elasticity and lightness to the fibers.
Step four: Yarn Put-up
Once you’ve determined the weight category of the sample yarn and any possible substitutions, you’ll want to look at the actual put-up of the yarn. The put-up refers to the ratio of the yardage to the weight (and the weight, in this case, refers to the actual weight of the skein of yarn, not the thickness of one strand).
First, look at the put-up of the sample yarn. For example, Cascade 220, a popular wool yarn (available at Lovecrafts), has 220 yards in a 3.5-ounce (100 gram) skein. The substitute yarn I choose should have similar yardage to weight ratio.
Perhaps I’m considering two different yarns as possible substitutes: Dishie (available at Knit Picks) and Wool of the Andes (available at Knit Picks), both have the same gauge and fit within the same CYC weight category as Cascade 220.
Dishie has a put-up of 190 yards to 100 grams (30 yards less than Cascade 220) and Wool of the Andes has a put-up of 110 yards to 50 grams (exactly the same as Cascade 220).
While it may not seem like a big difference when a large garment is involved that 30-yard difference becomes more noticeable. While the project would take the same amount of yarn, it would end up weighing quite a lot more if I used Dishie as a substitute.
So be sure to look at the put-up of the sample yarn and compare your substitute yarn choices to see if they have a similar put-up ratio.
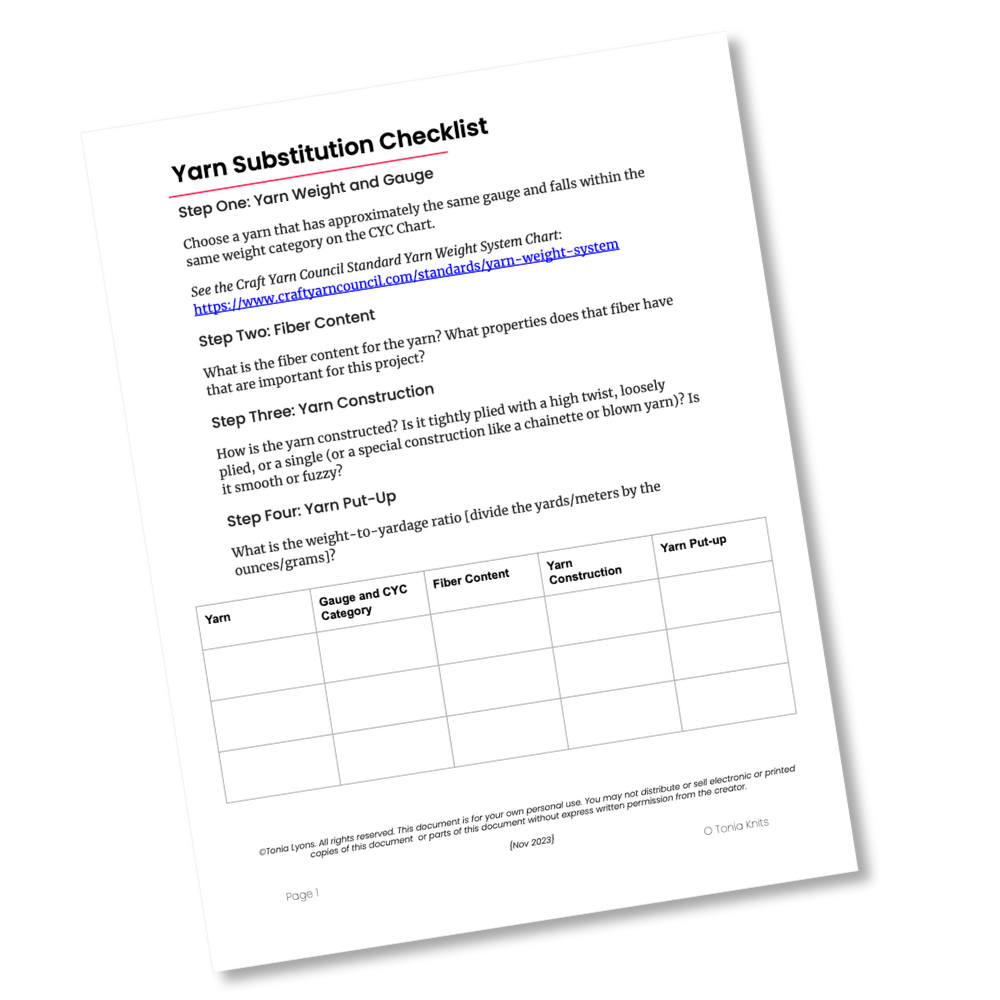
Yarn Substitution Checklist
Fill in the form below to get the FREE Yarn Substitution Checklist sent directly to your inbox – so you’ll be able to confidently substitute yarn in any knitting pattern whenever you need to!

Step five: Garment Characteristics
Once you’ve narrowed your substitute yarn choices down by using the four rules listed above (gauge, fiber content, yarn construction, and yarn put-up), it’s time to look a little closer at your possible choices and the knitting pattern itself. Three characteristics come into play in knitting patterns and vary in importance from one pattern to another.
These characteristics include:
- Stitch definition – how well each individual stitch is seen
- Elasticity – the ability of a garment to keep its shape
- Drape – the way a garment hangs or moves
Depending on the pattern, each of these characteristics vary in importance. For example, a cable sweater would need a yarn with good stitch definition (we really want those cables to pop) and elasticity (so the cables look good and the sweater keeps its shape). It doesn’t need a yarn with good drape – which isn’t important in the finished garment.
Let’s look more closely at these three characteristics.
Stitch Definition
Stitch definition refers to how difficult or how easy it is to see each individual stitch in a garment and this varies from one yarn to another and from one project to another. A cable sweater might require a yarn with good stitch definition but a soft, fuzzy sweater worked with mohair would not.
If you need a yarn with good stitch definition there are two things to look for:
- Tightly plied yarns
- Solid, lighter colors
If stitch definition isn’t an important factor, a fuzzy or loosely plied yarn, a dark color, or a yarn that is highly variegated are fine choices.
Look at the pattern you’re using and take a close look at the project photos. Can you see the individual stitches? Do you think this characteristic will be an important consideration when you’re choosing your substitute yarn? Remember, this will vary from one pattern to another.
If you believe stitch definition is an important factor, choose a yarn with a high twist and tight plies in a solid, light color for the best stitch definition.
Elasticity
Elasticity refers to the ability of a particular garment or yarn to go back to its original shape after being stretched out. This is an important factor in any ribbed cuffs or bands that need to stretch and fit to accommodate different body parts but also need to keep their shape and not sag over time. This is also important for socks (nobody wants droopy socks)! Elasticity is also important for stitch patterns where you are manipulating and moving stitches (like cables).
In general, animal fibres have more elasticity (wool has the most natural elasticity). Plant fibres are not elastic (that’s why cotton sweaters start to droop over time). But, to compensate for this lack of elasticity, you can find plant-based yarns (like cotton or linen) with some added wool or nylon that will help them keep their shape. How a yarn is constructed can also add some structure to a garment – look for chainette or ribbon yarns for some addition structure for plant-based yarns.
Again, this characteristic is important for some garments (like socks or cable knits) but not important for other garments (like soft summery tank tops or flowing shawls) where elasticity isn’t an important concern.
Drape
Drape refers to how the garment hangs and moves, something that’s especially important for shawls or summer garments that should have some flow and natural movement. How you knit can also affect the final drape of a garment – tight knitters produce tighter fabrics that have less drape (you may need to go UP a needle size to compensate), loose knitters produce fabrics that have more drape.
If drape is an important factor in a garment, look for plant fibers, silk, and alpaca, which all have good natural drape. Slippery yarns also produce less friction within the stitches so the fabric can move freely.
Look at the pattern and consider the drape – is it an important factor that you’ll need to take into consideration or is it something you can ignore in favour of other, more important factors?
Select Your Yarn Substitute
Once you’ve narrowed down your possible substitutions based on the first three rules – gauge, put-up, and fiber content – take a few moments to ensure your substitute yarn also meets the requirements for the pattern (stitch definition, elasticity, and drape).
After you’ve found a yarn that will suit your pattern, it’s time to figure out how much you’ll need to knit the pattern – let’s take a look at that below.
Yarn Substitution Checklist
Fill in the form below to get the FREE Yarn Substitution Checklist sent directly to your inbox – so you’ll be able to confidently substitute yarn in any knitting pattern whenever you need to!

How much yarn do you need?
Once you have selected your substitute yarn, you will have to do some simple math. Look at the section of the pattern that lists the material for the number of skeins for the sample yarn. Some patterns might even list the exact yardage you’ll need. If the pattern only includes the number of skeins, do a quick internet search for that particular yarn to see how many yards/meters in one skein. Multiply the yardage in one skein by the number of skeins needed for your pattern to determine the yardage you’ll need to purchase.
Once you know the yardage, look at the label for your substitute yarn and divide the total yardage by the yardage in one skein of the substitute for the number of skeins you’ll need to purchase to knit the pattern. Be sure to add a little extra for working a gauge swatch and any customizations you might want to make (especially if you’re adding any length to the body or sleeves of a garment).
Be sure to Swatch
Once you have your substitute yarn, you need to swatch to determine your gauge and to ensure that the fabric that is produced is what you want for your finished project. Work a large gauge swatch (at least six inches) and wash and block the swatch following the care information on the yarn label before taking your measurements.
More Helpful Information on Yarn Substitution
Sometimes we find a pattern we love but we want to customize or change something beyond just changing the yarn using the rules above. Let’s take a look at a few of those common questions.
And, if you’re still not feeling comfortable about your yarn substitution abilities, take a look at Yarn Sub – a website that’s devoted to helping you make proper yarn substitutions.
Can I use a different yarn weight in a knitting pattern?
You can substitute a different yarn weight (for example using a DK weight yarn instead of a worsted weight) in a particular knitting pattern but it’s best to only go up or down one yarn weight/size (do not expect a worsted weight pattern to work well with a fingering weight yarn).
Knit a large swatch (at least six inches wide) and wash and block the swatch before taking your gauge measurements. When you are happy with the fabric and know how many stitches per inch/cm in your swatch, look at the schematic of the knitting pattern and choose the bust circumference (or the largest part of the garment if that isn’t the bust circumference), including the ease you prefer. Take that number (in inches or centimeters) and multiply it by your stitch gauge to determine how many stitches you would need at the widest point of your garment. Now, look at the knitting pattern and find that area of the pattern (the bust circumference) and see if there is a size that uses the same (or very close to) your final stitch count. Use the instructions for that size, adjusting the row gauge as needed.
What happens if you use the wrong size knitting needles?
Knitting needles are the ‘measuring cup’ for your stitches – each stitch should be sized according to the needle. Larger needles will produce larger stitches. Smaller needles will produce smaller stitches.
If your gauge for a particular pattern isn’t matching the designers, you can change needle sizes to knit another swatch and match their gauge. If you are getting too many stitches per inch, go UP a needle size to make larger stitches. If you are getting too few stitches per inch, go DOWN a needle size, to make your stitches smaller.
How can you determine the weight of a yarn?
If you don’t have the yarn label available, you can wrap the yarn around a pencil and measure the wraps-per-inch. To do this: wrap the yarn around the pencil for a few inches, keeping the yarn snug and the strands close to each other, but don’t tug or tighten the yarn. Use a ruler to measure the wraps.
The Craft Yarn Council’s standards for yarn weight:
| CYC Weight | Wraps-Per-Inch |
| 0 – Lace | 30-40+ |
| 1 – Super Fine | 14-30 |
| 2 – Fine | 12-18 |
| 3 – Light | 11-15 |
| 4 – Medium | 9-12 |
| 5 – Bulky | 6-9 |
| 6 – Super Bulky | 5-6 |
| 7 – Jumbo | 1-4 |
What does the ‘weight’ of yarn mean?
The yarn weight refers to the thickness of one strand of yarn, not the actual weight of one skein of yarn. The thickness (or weight) of a yarn depends on the number of plies in the yarn and how loosely or tightly they have been spun as well as the fiber content of the yarn.
More Knitting Help
- How to Increase in Knitting (Essential Increases for Every Knitter)
- 5 Basic Knitting Cast On Techniques every Knitter Should Know
- How to Decrease in Knitting (6 Basic Techniques for Every Knitter)
