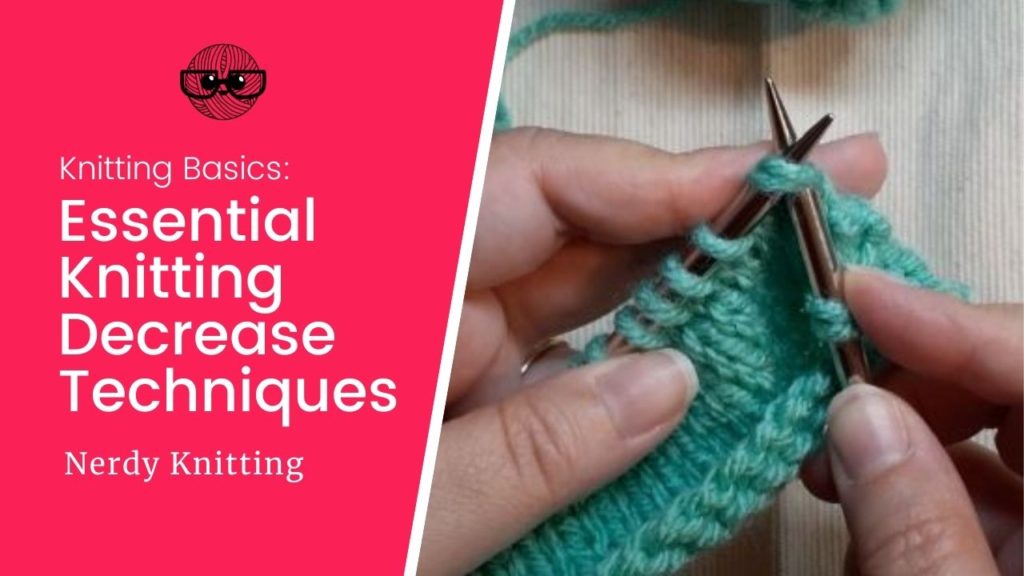
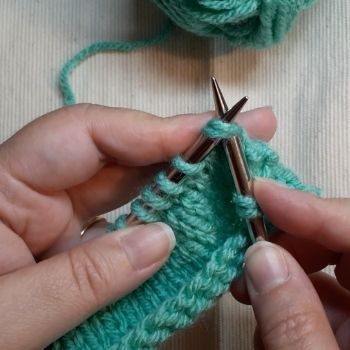
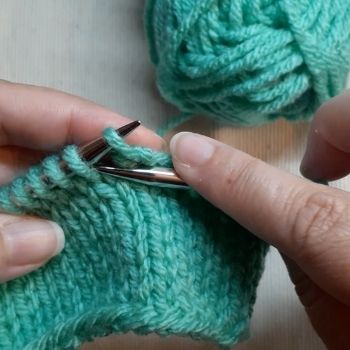
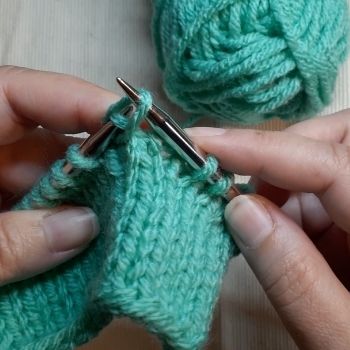
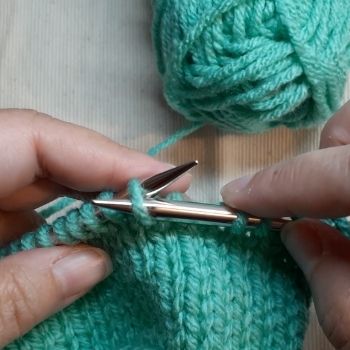
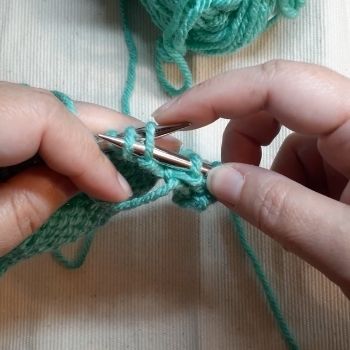
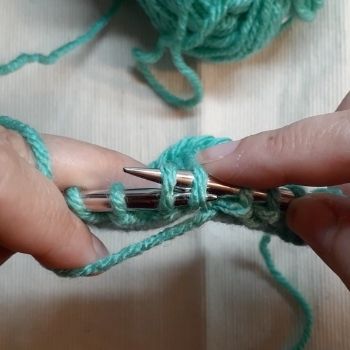
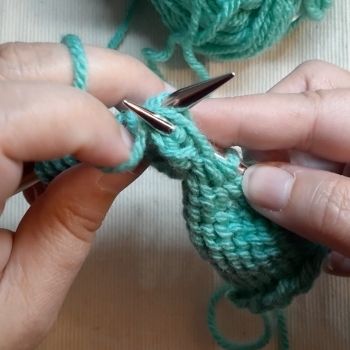
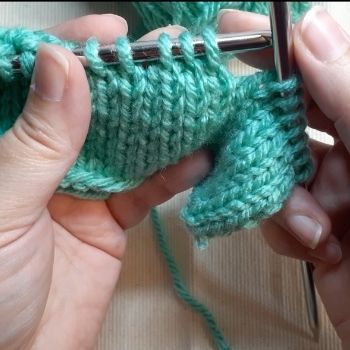
Every knitter needs to know how to decrease stitches in their knitting. The most basic knitting decrease involves knitting two stitches together (the k2tog) as one stitch.
To work the ‘knit two together’ decrease, insert the right needle into the first two stitches on the left needle, inserting into the second stitch and then into the first. Wrap the yarn around the right needle as if to knit and pull the new stitch through, dropping both stitches off the left needle. Two stitches have been decreased to one stitch and this decrease leans off to the right (a right-leaning decrease).
While the ‘knit two together’ is one standard decrease that every knitter should know, there are a few more that are important. These include:
- K2tog (knit two together) – discussed above
- KSP (knit, slip, pass over)
- P2tog (purl two together)
- SSK (slip, slip, knit)
- SKP (slip, knit, pass the slipped stitch over)
- SSP (slip, slip, purl)
In this article, we’ll take a look at each of these decrease methods – how to work them, when you would want to use each one, and how to pair them.
What is a Decrease?
A knitting decrease involves working two (or more) stitches together to reduce the total number of stitches in the row.
They are often used for shaping in a sweater (for example, to shape the waist or sleeves), to shape a shawl (for example, shawls worked on the bias will include paired increases and decreases to create the bias shape), shaping for other garments (decreasing the crown of a hat or a mitten are common uses) and in lace knitting (paired with yarn overs to create the decorative elements of the design).
The decreases in this article all decrease by one by working two stitches together to create one stitch. They all have a decided slant – either to the right or to the left and can be worked so they are barely noticeable (slanting with the selvedge edge of a garment conceals a decrease) or positioned so they appear more decorative (like decreases worked to created the swirled pattern on the top of a knit hat). The stitch that sits on the top of the decrease produces this slant. The second stitch is hidden underneath the slanted stitch.
While any decrease can be used when knitting a pattern, there are times you’ll want to take some time to choose the right kind of decrease in a particular situation. If you’re working a textured pattern, a purl decrease might be more appropriate. If you’re doing a colorwork design, the stitch that should be placed on top might give you a clue as to which decrease should be used. And, if you want your decreases to slant in a certain direction, you have the option to choose the one that suits the situation best.
Here’s a list of more ways to use knitting decreases:
- Decreases can be used to create vertical darts or shaping in a garment.
- Use decreases across at regular intervals across one row to gather the material – a few decreases for a tighter cuff, many decreases for a dramatic, gathered, cuff.
- Use decreases to create ruched bands of gathers (use increases to create the ruching, work a number of rows, then decrease down to the original stitch count – working the decreases evenly across one row).
- Mitered squares and edges (like V-neck collars) use decreases to create the shape.
- Shawls knit on the bias use increases along one edge and decreases along another to create the bias shape.
- Chevron shapes are also created with combinations of increases and decreases.
- Lace knitting involves pairing decrease stitches with yarn overs to create many different designs.
Mirrored Decreases
When knitting garments, mirrored decreases are often used. This simply means that two decreases are paired – they are worked in the same row at different ends of the garment piece, and slant in opposite (or mirrored) directions.
For example, you may work an SSK for shaping one edge of a V-neck sweater. The appropriate mirrored decrease for the other edge of the neck shaping would be a K2tog. The decreases are worked in the same row and slant in opposite directions.
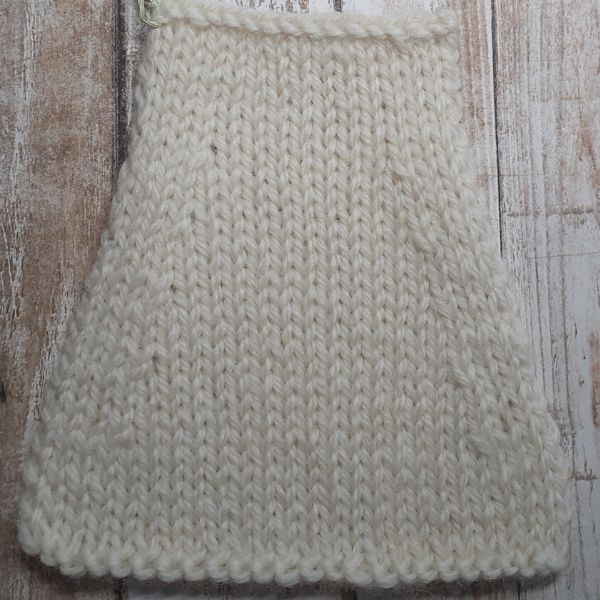
Blended decreases 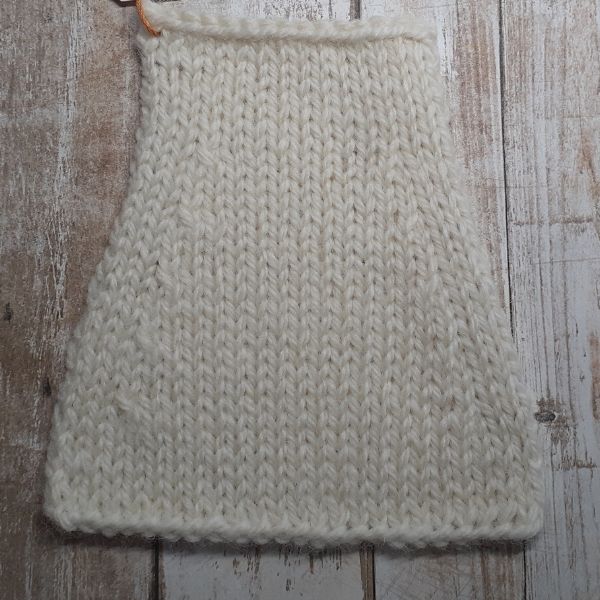
Full-fashioned decreases
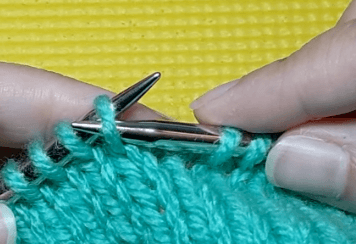
Paired decreases can be used in two different ways when working shaping (like armholes or necklines). When the decreases follow the slant of the shaping (for example, when an armhole is shaped and leans to the left and SSK decreases – which are left-leaning – are used), this is often referred to as blended decreases – since they blend into the shaping and aren’t as noticeable (see image 1 above).
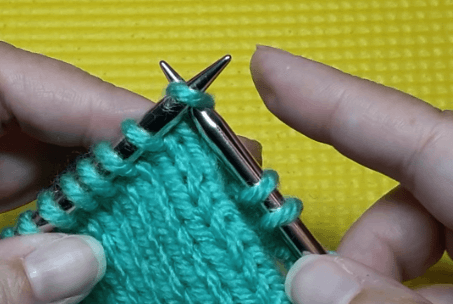
Full-Fashioned decreases are the opposite of blended decreases. They produce visible slants that face the slant of the garment shaping and are usually placed a few stitches in from the selvedge to be most noticeable (see image 2 above). For example, using a K2tog along the armhole edge that slants to the left makes a noticeable decrease line. You’ll often see these types of decreases used in machine knit garments.
Slipping Stitches Knitwise
Some decreases involve slipping stitches, which can be worked in two different ways – purlwise (or ‘as if to purl’) and knitwise (or ‘as if to knit’).
Stitches can be slipped purlwise, which maintains the stitch mount. To slip a stitch purlwise, simply insert the right needle into the first stitch on the left needle as if to purl (that is, insert the needle into the front leg of the stitch from right to left) and move this stitch from the left needle to the right needle (see first image below). This type of slipped stitch is commonly used when a pattern uses the generic term ‘slip a stitch’ or in slip-stitch knitting patterns. It is NOT generally used when working decrease stitches.
The second way to slip a stitch – knitwise – is the method used when working decrease stitches. To slip a stitch knitwise, insert the right needle into the first stitch on the left needle as if to knit (that is, insert the needle into the front leg of the stitch from left to right – see second image above) and move this stitch to the right needle without working it. When you are working a decrease stitch that involves slipping stitches, they are always (unless the instructions tell you otherwise) slipped knitwise.
Right-Leaning Decreases
These first three decreases produce a stitch that leans to the right when viewed from the right side of the work. The K2tog is the most common and easiest to work. The KSP is a less-popular alternative. The P2tog is the purl side version that is usually used on the wrong side of the work.
K2tog Decrease
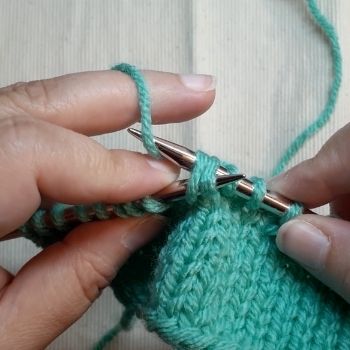
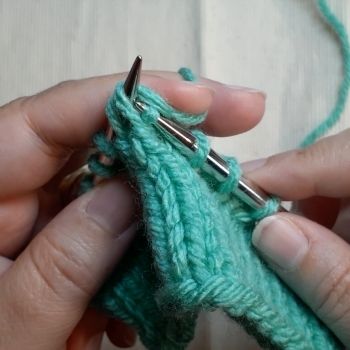
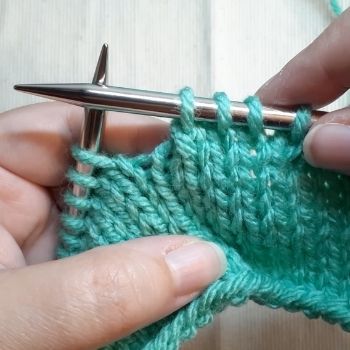
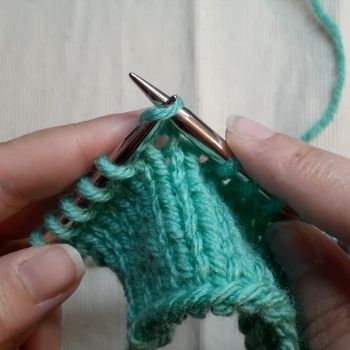
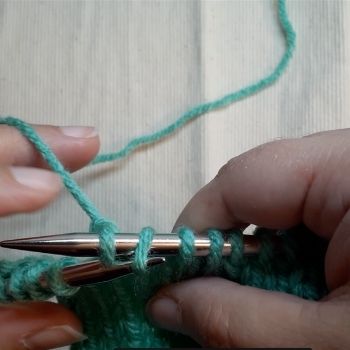
The ‘knit two together’ (abbreviated as K2tog) decrease is probably the most common decrease. To work a K2tog:
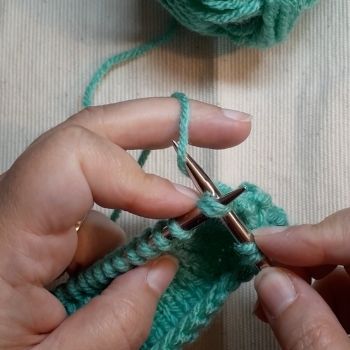
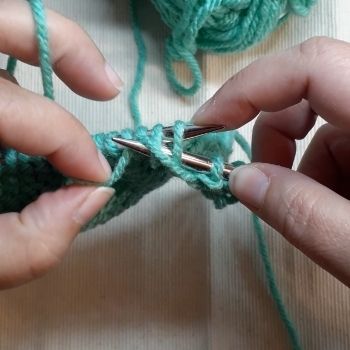
- Insert the right needle into the second stitch and into the first stitch as if to knit (inserting into both stitches at once). See image 1 below.
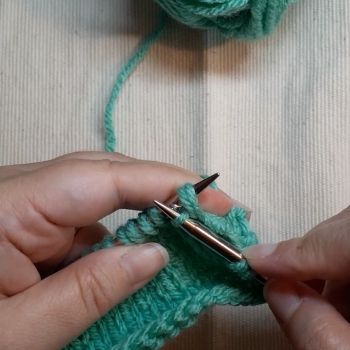
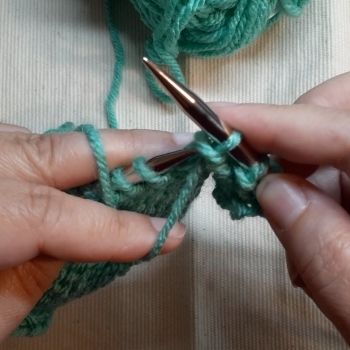
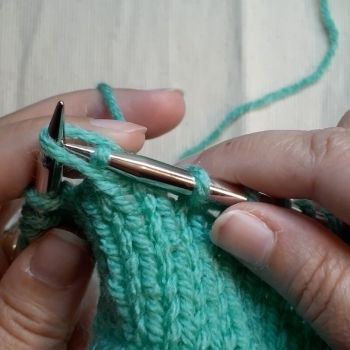
- Wrap the working yarn counterclockwise around the inserted needle (as if you’re going to knit). See image 2 below.
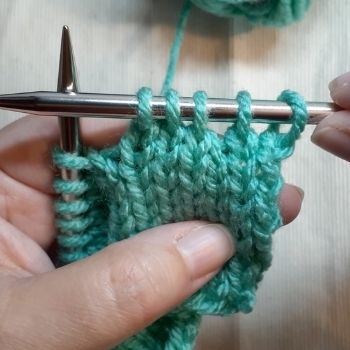
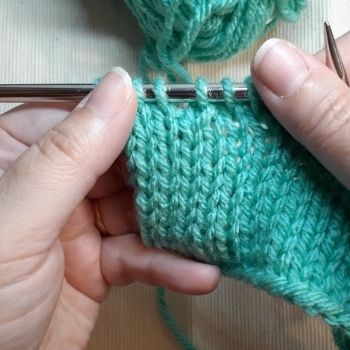
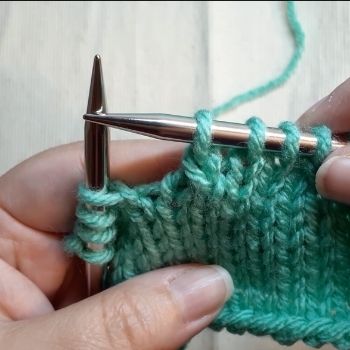
- Pull the new stitch through and drop both of the stitches off the left needle. See image 3 below.
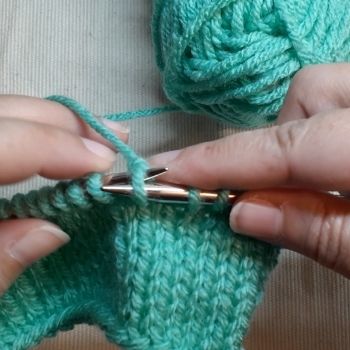
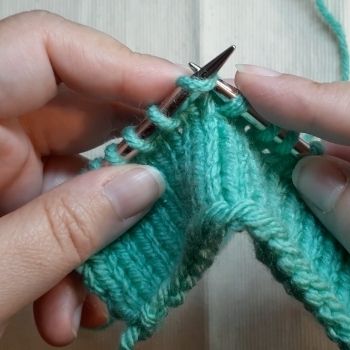
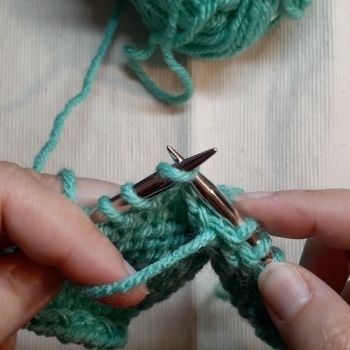
The second stitch is the stitch that will sit on the top and provides the slant to the right. See image 4 below – the stitch in the center is a K2tog.
This decrease is often used when many stitches must be decreased (and the slant isn’t important to the design) or to create decorative decreases (like the crown of a hat or top of a mitten)
KSP Decrease
The less popular cousin to the K2tog is the KSP decrease – which is also a right-slanting decrease. Because the K2tog is so simple to work, the KSP is not often used or recommended but it is an option that you should be aware of.
To work a KSP (knit, slip, pass a stitch over):
- Knit the first stitch and slip this stitch back to the left needle (slipping it purlwise). See image 1 below.
- Insert the right needle into the front leg of the second stitch and bring it up and over the first stitch, dropping it off the needle. See images 2 & 3 below.
- Slip the remaining stitch back to the right needle.
The stitch that is passed over provides the right-leaning slant of this decrease.
Unlike the simple to work, K2tog, the KSP involves multiple steps and moving the stitch between both needles. While it isn’t as simple to work, it is another option for a right-leaning decrease.
P2tog Decrease
The ‘purl two together’ (abbreviated as P2tog) decrease is also a right-slanting increase. It’s generally worked on the wrong side of the work (especially in Stockinette garments, worked on the reverse Stockinette side) and, when viewing the right side, the decrease slants to the right (see image 4 below). It can also be used on the front of the work when a purl stitch (and decrease) are needed.
To work a P2tog:
- Bring the yarn to the front and insert the right needle into the first and second stitches on the left needle as if to purl (inserting from right to left into the front leg of both stitches). See image 1 below.
- Wrap the yarn to create a purl stitch. See image 2 below.
- Pull the new stitch through both of the stitches on the left needle, letting them drop off the needle. See image 3 below.
Left-Leaning Decreases
Not all decreases need to lean to the right. The three decreases explained below lean to the left and can be used when you want to mirror the right-leaning decreases or if you prefer using decreases that lean to the left. The SSK is the most commonly used left-leaning decrease but the SKP is a good alternative (and many find it’s slightly neater appearance is a better match to their K2tog decreases). The SSP is the decrease to use if you’re looking for a mirrored decrease for the P2tog as it produces a left-leaning slant (worked on the wrong side of the fabric) when viewed from the front of the work.
SSK Decrease
The ‘slip, slip, knit’ (abbreviated as SSK) is usually paired with the K2tog to create mirrored decreases. The name is often confusing for new knitters who don’t realize it’s a decrease stitch and they do exactly as the abbreviate instructions (slip a stitch, slip a second stitch, and knit the third stitch). But the instructions actually mean that you slip the two stitches as if to knit then knit them together through the back legs of the stitches.
Slipping the stitches knitwise (inserting the right needle into the first stitch on the left as if to knit and moving it to the right needle) changes the stitch mount. Usually (in the standard Western method most commonly used in North America), each stitch is mounted so the right leg sits in front and the left leg sits in the back. Slipping a stitch knitwise changes this stitch mount so the right leg now sits in the back.
To work an SSK:
- Slip two stitches knitwise, one stitch at a time. See image 1 below.
- Insert the left needle into the front of these two stitches so you are already in the position to knit them together through the back legs/loop. See image 2 below.
- Knit the two stitches together from this position (referred to as ‘through the back legs/loops’ – abbreviated ‘tbl’). See image 3 below.
This method of manipulating the stitches for this decrease puts the first stitch on top and produces the left-leaning slant (see the final image below).
The downside of the SSK decrease is that it’s sometimes messy compared to the neat appearance of the K2tog. When the stitch is slipped knitwise the yarn plies can ‘untwist’ and become slightly looser, which makes the appearance of the SSK slightly larger compared to the K2tog. The back-and-forth manipulation of the stitches between the two needles can also affect the final appearance of the decrease stitch. The more the stitches are moved and worked, the more excess yarn is worked into the stitches, making the final stitch appear larger than the K2tog.
Twisted SSK: There are two variations of the standard SSK that create a slightly neater appearance, but both methods involve creating twisted versions of the decrease (meaning the stitches aren’t slipped to adjust the mount of the stitches before decreasing).
For the fully twisted version, skip the first step of slipping both stitches knitwise (which changes their stitch mount) and move right to the second instruction – knitting both stitches together through the back legs. Skipping the first step but still knitting through the back legs twists both stitches and does make a neater looking decrease. But it doesn’t mirror the standard K2tog since these stitches are twisted.
The variation on the twisted version slips just the first stitch so the decrease looks untwisted. To work this version – slip the first stitch knitwise (to change the stitch mount) but, instead of slipping the next stitch, transfer this slipped stitch back to the left needle and knit it with the next stitch through the back legs of the stitches. The top stitch remains untwisted (so it mirrors the K2tog) but the second stitch that lays underneath is twisted. Working an SSK in this manner can be neater since only one stitch is slipped and doesn’t require as much manipulation between the needles.
SKP Decrease
The SKP (‘slip, knit, pass the slipped stitch over’) is an alternative to the SSK as it’s also a left-leaning decrease. You may see this decrease referred to using some other abbreviations – ‘sl 1, k1, psso’ or SKPO.
To work the SKP:
- Slip the first stitch knitwise (this changes the mount of the first stitch and places the right leg in the back). See image 1 below.
- Knit the next stitch as a normal stitch.
- Insert the left needle into the front leg of the slipped stitch on the right needle. See image 2 below.
- Bring the slipped stitch up and over the first stitch, dropping it off the needle. See image 3 below.
The slipped stitch that is pulled over the second stitch produces the left-leaning slant of the decrease (see image 4 below).
For some, they find the SKP is a neater mirrored decrease for the K2tog. It may be neater in appearance because only one stitch is slipped (as opposed to two in the SSK decrease), while the stitch that sits underneath doesn’t lose its twist since it’s treated as a regular knit stitch. But it’s always a good idea to swatch and see which left-leaning decreases best matches your K2tog decrease.
SSP Decrease
The SSP (slip, slip, purl) is the paired decrease for the P2tog and, like that decrease, is often worked on the wrong side of the work (especially if the fabric is Stockinette and it’s worked on the reverse Stockinette side of the fabric). When viewed from the right side of the work, it slants to the left (see image 4 below – the center stitch is an SSP). Unlike the SSK, it keeps its neat appearance (so it could also potentially be paired with K2tog; the downside is that they wouldn’t be worked in the same row).
To work an SSP:
- Slip two stitches knitwise, one at a time. See image 1 below.
- Transfer these stitches in their new positions back to the left needle. See image 2 below.
- With the yarn held to the front of the work, insert the right needle into the back legs of the stitches as if to purl (moving the right needle to insert from left to right into both stitches, entering the second stitch first), and wrap the yarn to create the purl stitch, pulling it through both stitches and letting the just worked stitches drop off the left needle. See image 3 below.
Twisted SSP: Like the SSK, the SSP can also be worked in a twisted manner. Instead of slipping the two stitches, skip that step and just purl them together through the back legs.
Improving Decreases
When pairing decreases, many knitters often find that their left-leaning decreases are more noticeable than their neat-and-tidy right-leaning decreases. This may be caused by the extra manipulation required to work the left-leaning decreases or because the yarn plies may ‘untwist’ when the stitches are slipped knitwise (depending on how highly twisted the original yarn plies are, this may or may not be the case) or any number of reasons. But there are a few things you can do to improve your paired decreases:
- Instead of working an SSK try an SKP.
- Try working the SSK on the very tips of your needles and manipulating the stitches as little as possible.
- When working the SSK, before (or after) knitting them through the back legs, use your needle to give the exposed leg of the stitch underneath a small tug to pull some of the excess yarn out of the top left-leaning stitch.
- On the row before the SSK will be worked, wrap the yarn in the opposite direction to re-seat the mount of those two stitches. When you come to them on the right side of the work they won’t need to be slipped before working them together through the back legs.
- If you don’t care if the stitches are twisted work one of the twisted SSK versions explained above.
- If neither decrease produces the look you want, try an SSP, working it on the row after the K2tog.
There are certainly more ways to create increases but I find that these are the most useful and at least one of these techniques can be used in almost any situation where adding stitches to your knitting is necessary.
For further information on this topic, take a look at the resources list below (some links are affiliate links – I may receive a small commission at no extra cost to you if you click through and make a purchase; see the disclosure policy for more details).
Recommended Resources
- Vogue Knitting (available on Amazon)
- Increase, Decrease by Judith Durant (available on Amazon)
- Knitter’s Handbook by Montse Stanley (available on Amazon)
- Big Book of Knitting by Katharina Buss (available on Amazon)
- The Principles of Knitting by June Hemmons Hiatt (available on Amazon)
- “SKP & KSP – Left and Right Slant Decreases” by Jean Lampe, Cast On (The Knitting Guild Association)
- “Decreases Revisited Parts 1 & 2” by Binka Schwan, Cast On (The Knitting Guild Association)
More Knitting Techniques
- How to Increase in Knitting (Essential Increases for Every Knitter)
- The Basics of Slip-Stitch Knitting
- Knitting Twisted Decreases (everything you need to know)
