
Casting on is a basic skill every knitter needs to know – otherwise, you won’t be able to knit. Casting on provides the stitches that are needed to begin the project. There are many ways to cast on and it’s a good idea to know more than one because you can choose the appropriate cast on based on the project you are knitting and the finished look or elasticity you want from your cast-on edge.
Sometimes knitting patterns don’t tell you which cast on to use so it’s important to understand how to work a few different methods so you can choose the one that you’d like to use and would best suit your project.
Here are the basic knit cast on techniques knitters should know:
- Knit cast on
- Cable cast on
- Backwards loop cast on
- Long-tail cast on
- Crochet chain cast on
In this article, we’ll look at each of these cast-on methods – how to work them, the benefits and drawbacks of each, and when you should choose each specific cast on.
Links below include affiliate links. If you click through and make a purchase I may receive a small commission at no extra cost to you. See the disclosure policy for full details.
Basic Cast on Methods for Every Knitter
There are many ways to cast on stitches for your knitting (this one book covers 54 various cast on and bind off methods). Some are loose and stretchy while others are firm and stable. While you could certainly learn just one cast-on method for all your knitting projects, I think it’s a good idea to understand how to work a few different methods. You might discover you love the look of a particular cast on or that you like the stretch another provides to your hand-knit projects. But you won’t know until you try!
These five cast-on methods are versatile enough to cover almost all of your knitting needs – from loose, quick cast-on stitches that are needed in the middle of your knitting to a firm edge that provides a solid foundation.
Many cast on methods begin with a slipknot. If you need a refresher on how to work a slipknot, scroll to the end of this post for a photo-tutorial.
Knit Cast On
The Knit cast on is a perfect cast on for new knitters who have just learned the knit stitch because the cast-on stitches are made in much the same manner.
To work the Knit Cast on:
- Start with a slipknot on the left needle.
- Insert the right needle into the slipknot on the left needle. See image 1 below.
- Wrap the yarn counterclockwise around the right needle. See image 2 below.
- Pull the new stitch through (image 3) and, while holding the two needles parallel, place the new stitch on the left needle (image 4).
- Repeat the process to cast on the required number of stitches.


Benefits:
- Stretchy
- Some elasticity (meaning it will hold its shape)
- Easy to work (just like knitting)
Drawbacks:
- Can appear loose if not worked carefully
- First row of knitting can appear loose
When to use:
- When a stretchy edge is required
- To cast on extra stitches at the beginning of a row

Cable Cast On
Once you know how to work the Knit cast on, the Cable cast on is easy to learn. It’s worked in the same basic manner with one slight variation – instead of inserting the needle INTO the first stitch on the left needle, the right needle is inserted BETWEEN the first and second stitches.
To work the Cable Cast on:
- Start with a slipknot on the left needle.
- Work the first stitch as a Knit Cast on (see above).
- When you have two stitches on the left needle (the slipknot and the first stitch created using the Knit Cast on), insert the right needle between the two stitches. See image 1 below.
- Wrap the working yarn counterclockwise around the right needle. See image 2 below.
- Pull the new stitch through (image 3) and, while holding the needles parallel, place the new stitch on the left needle (image 4).


Benefits:
- Firm and stable
- Neat, rope-like edge
- Some stretch
Drawbacks:
- Not as elastic as some other cast-on methods
- Easy to work cast on too tightly
When to use:
- When a stable edge is required
- For buttonholes
- For ribbing that needs to stretch but hold its shape
- To cast on extra stitches at the beginning of a row
Discover the Confidence You Need to Fix Your Knitting Mistakes

By the end of this six-part self-paced course, you’ll be able to read your knitting, recognize a variety of knitting mistakes, and understand how to fix them.
Backwards Loop Cast On
The Backwards Loop cast on is also referred to as the E-Wrap or Half-Hitch cast on. It’s commonly the first cast on method for many people but it’s not a great option for most projects (but does have its uses).
Instead of beginning with two needles like the cast ons explained above, this cast on begins with one needle and your thumb is used to create the loops that will be placed on the needle.
To work the Backwards Loop Cast on:
- With the needle in your right hand (with a slipknot on the needle), hold the yarn in your left hand, palm down, and place your thumb on the yarn extending out from the needle. Image 1 below.
- Turn your thumb towards your body and up (making a ‘thumbs up’ sign) to create the loop. The yarn attached to the needle will be on top and the working yarn will be on the bottom. Images 2 & 3 below.
- Bring the needle underneath the bottom strand and between the two strands. Images 4 & 5 below.
- Tighten the new stitch (image 6) and repeat the process to cast on the necessary number of stitches.


Benefits:
- Very stretchy
- Easy to cast on stitches in the middle of knitting
- Can be used to work an increase stitch
Drawbacks:
- Difficult to work the first row after casting on
- Uneven tension
- Very loose
When to use:
- When casting on only a few stitches
- When casting on in the middle of a row of knitting
- When casting on stitches at the underarm
Long-Tail Cast On
The Long-Tail cast on (sometimes called the Double cast-on or Slingshot method) is actually an improvement on the Backwards Loop cast on.
In the Slingshot version of the cast on, the left-hand holds the yarn and the needle is in the right hand. With the Thumb method, the left thumb is used to make the backward loop and the right index finger holds the yarn that adds the first row of stitches to the cast-on row.
While there are two ways to hold the hands, needles, and yarn, they produce the same end result – a clean, elastic edge that is versatile and useful for many knitting situations (I would recommend this as the one cast-on method every knitter should know because it’s so versatile).
Learning this method can be tricky as you learn how to hold everything and manipulate the yarn and needles to create the stitches. But once you understand how it’s worked, you will become quicker and this may become one of your favorite cast-on methods.
This method uses two strands of yarn – the yarn attached to the ball of yarn and the tail. It’s important to leave a long enough tail to work the number of cast-on stitches. There are a few ways to estimate this and these methods are explained below (after the instructions for working the cast on).
To work the Slingshot method:
- Begin by placing a slipknot on the knitting needle leaving a long tail of yarn.
- The first step is getting your hand into the correct position. The needle with a slipknot should be held in the right hand. The yarn tail should be wrapped around the thumb and the yarn coming from the ball or skein of yarn is wrapped around the index finger. Image 1 below.
- With the yarn, hands, and needle in this position, bring the needle beneath the bottom strand and up through the loop on the thumb. Images 2 & 3 below.
- Wrap the yarn from the index finger as if to knit, bringing the yarn up and around the needle counterclockwise. Image 4 below.
- Bring this stitch back through the loop on the thumb (image 5) and tighten the new stitch on the needle (image 6).
- Repeat the process for all the necessary cast on stitches.


To work the Thumb method of this cast on:
- The yarn tail is wrapped around the thumb in the same manner as the Backwards Loop Cast on. The working yarn is on the right index finger. The needle is in the right hand.
- Bring the needle beneath the bottom strand of yarn on the thumb and up into the loop on the left thumb. Image 1 below.
- Wrap the yarn on the right index finger as if to knit, bringing the yarn counterclockwise around the needle. Image 2 below.
- Bring the needle back down through the loop on the thumb with the new stitch on the needle (image 3) and tighten the yarn on the thumb.
- Repeat the process to cast on the required number of stitches.


Benefits:
- Easy to work
- Stretchy but stable
- Good all-purpose cast-on technique
Drawbacks:
- Noticeable difference in front and back edges
- Requires careful attention to tension or it can be messy and uneven
- Requires estimating enough yarn for the tail
When to use:
- Good as an all-purpose cast-on for many different projects
The edge created looks different on each side and most people prefer the front of the cast-on edge as their facing side. This means that the first row of knitting is actually a wrong-side row to put this front edge on the right side. If you’re knitting in the round, no worries, that right side will face out when you join to work in the round.
Ensuring you have enough yarn for the cast on
The other cast-on methods in this article all begin with a short tail and a slip knot allowing you to use the working yarn to create the cast on edge. But the Long-Tail method uses two ‘long tails’ of yarn to create the cast on edge, so it’s necessary to measure out a length of yarn before casting on.
The one complaint many knitters have about this cast-on is this one fact – because it’s very common to play ‘yarn chicken’ and run out of yarn before completing the cast on. Then the cast on must be pulled out and more yarn allowed to re-cast on the required number of stitches.
To avoid this problem, there are a few ways you can ensure you have allowed enough yarn for the tail. One quick method to estimate is to wrap the yarn around the needle 10 times (to simulate 10 stitches) and multiply that for the number of needed stitches. For a more accurate measurement, cast on 10 or 20 stitches leaving a very short tail.
Pull the needle out, pinching the last cast-on stitch. Give the yarn tail a small tug with the other hand to remove the stitches. The length from the end of the yarn to where you pinched the final stitch shows you how much you need for those 10 or 20 stitches. Multiply this amount by the number of cast on stitches that are needed.
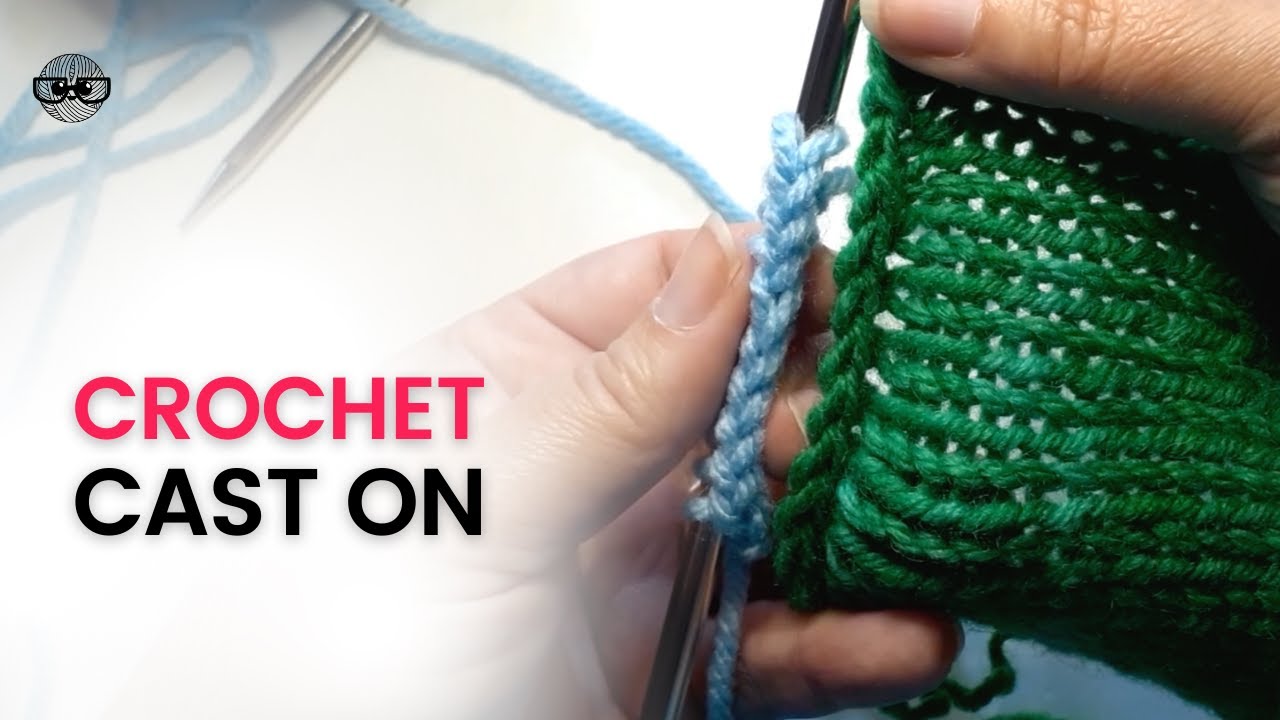
Crochet Chain Cast On
The Crochet Chain cast on (also called the Chained cast on) produces a nice, firm edge that closely resembles the basic bind off. If you are knitting a flat project (like a scarf) and want both the cast-on and bind-off edges to be as similar as possible, the Crochet Chain cast on and the basic bind off are a good match.
This cast-on is also commonly used as a provisional cast-on when worked in waste yarn. After the row of stitches is created, switch to your project yarn and begin knitting. When you’re ready to work the other end you simply ‘unzip’ the crochet chain and pick up the live stitches to work in the other direction.
To work the Crochet Cast on:
- Make a slipknot and place it on the crochet hook. The empty needle is in the left hand and the crochet hook is in the right. See image 1.
- Hold the working yarn in the left hand and bring it underneath the needle. Bring the crochet hook over the needle and catch the yarn. See images 2 & 3.
- Bring the yarn through the slipknot on the crochet hook. See images 4 & 5.
- Move the working yarn between the needle and the crochet hook (image 6), bringing it underneath the needle again to repeat the process.
- Cast on all but one of the required stitches. Hold the crochet hook and needle parallel, bring the yarn to the back between the two, and move the final stitch from the crochet hook onto the needle.


Benefits:
- Matches the basic bind off
- Produces a firm edge
Drawbacks:
- Requires a crochet hook
- Can be more time-consuming
When to use:
- When you want your cast on and bind off edges to match (and you are using the basic bind off)
- As a provisional cast-on when you will be knitting stitches from both directions of the cast-on edge
- To begin a tubular cast on
More Cast-On Tips
Now that you know how to cast on using a variety of methods, there’s still a bit of information that you might find useful. We’ll discuss how to create a slipknot and an optional ‘no knot’ start for the Long-Tail Cast on, how to choose the right cast on for your knitting projects, and a few ways to further improve your cast on technique.
How to Make a Slipknot
A slipknot is a simple thing that every knitter needs to know since it’s used so often. To make a slipknot:
- Make a loop of yarn on the first two fingers of your hand, pinching both ends between your thumb and index finger. See image 1.
- Wrap the yarn around your first two fingers again, to the left of the first loop, brining it around and pinching the tail with your thumb and index finger as well. See image 2.
- Insert the knitting needle between the two loops from bottom to top. See image 3.
- Use the needle to draw the second loop through the first (see image 4) and tighten the slipknot.


An alternative to the slip knot is a ‘no knot’ start for the Slingshot method of working the Long-Tail Cast on. To work this ‘no knot’ method:
- Hold the yarn as you would for the Slingshot method for the Long-Tail Cast on – with the yarn tail over the thumb and the yarn attached to the skein over the index finger. With the needle in the right hand, place it on top of the yarn in a perpendicular manner. See image 1 below.
- Move the needle down and towards your body and twisting it up (creating a ‘U’ shape with your hand). See image 2.
- The loop on the needle acts as your first cast-on stitch (see image 3) and you can continue casting on using the Slingshot method.


Casting on for Left Handed Knitters
While there are ways to reverse engineer a variety of cast on techniques to accommodate left-handed knitters, I don’t recommend them. Knitting requires both hands to do every task – even casting on stitches. So there is no need to reverse engineer every technique when you’ll need to use both hands to complete the task anyway.
Casting on a Large Number of Stitches
Casting on stitches for a large project can be time-consuming – especially when you are stopping to count and recount your cast-on stitches. Instead of all that counting and recounting, there are a few things you can do.
Place a marker at regular intervals (every 10, 25 or 50 stitches). Then you only need to count your markers and the stitches in the final section of your cast-on.
If you don’t want to use markers, you could also use a long length of scrap yarn. Cast on your first set of stitches (10 or 20, for example) and place a length of yarn over the right needle after that last cast on stitch, leaving a short tail to the back and the long length in the front. Begin your next set of 10 or 20 stitches.
When you have completed that section, bring the length of yarn across the front of those cast on stitches, and place it over the right needle just after the last stitch, moving the scrap yarn towards the back. Continue this process at set intervals and the scrap yarn will be ‘woven’ back and forth at your predetermined intervals and you can use that to keep track of your cast-on stitches.
Choosing the Right Cast On for the Project
When a pattern doesn’t specify which cast on to choose, the knitter has a decision to make, right at the beginning of their project – which cast-on method to use. And, even if a designer does specify a certain cast-on technique, there are no rules that declare you must use that cast on method when another might work just as well.
The most important consideration for a cast on is whether it’s elastic or firm.
Margaret Radcliffe, The Knowledgeable Knitter
It really comes down to one question – does your project require a supportive or firm cast-on edge or does it require a stretchy cast-on edge?
Every project is different and requires a different degree of stretchiness. For example, the cuff of a sweater should have enough stretch to fit over the hand but still be firm enough to hold its shape.
Using the cast-on methods above:
- For a firm edge, choose the Cable cast-on
- For an elastic edge, choose the Long-tail cast on
- For a loose, stretchy cast on, choose the Knit cast on or Backwards loop cast on
Improving Cast On Edges
A cast on edge should be firm, stretchy if necessary (for example, in a K2P2 rib), and not too tight. But, like in other areas of knitting, our natural tendency may be to work too tightly or too loosely than is required.
If you’re unsure whether you cast on too tightly or too loosely, there are a few things to look for. A loose cast-on edge will flare out at the sides and the first row of stitches appear larger than those above the cast on row. A tight cast-on edge will pull in at the edges and may look like an inverted ‘U’ with stitches that appear to lean out from the center to the edges.
If you have a tendency to cast on too tightly, there are a few things you can do to remedy the situation:
- Use a larger needle size (for the Knit or Cable cast-on methods)
- Use your finger to space the cast on stitches out (after casting on one stitch, place your finger after the stitch and hold it there while casting on the next stitch) for the Long-Tail method
- Be careful not to tighten the yarn after casting on each stitch
If you have a tendency to cast on too loosely, try using a smaller needle size for the cast on stitches.
While the five cast-on methods explained here are perfectly suitable for most situations, there are even more cast-on techniques you can try – from decorative edges (like the picot or Channel Island cast on) to tubular edges that produce an almost invisible edge to two (or even three) color cast-on edges. There are also more ways to work the provisional cast-on when you want to work from one point in two different directions. And a closed cast-on is also good for things like lacy, round shawls that start with a pinhole cast-on or toe-up socks that require a closed flat cast-on. You could spend a lot of time just exploring the many ways to cast on your knitting projects!
For more information on the cast on techniques mentioned here, see the resources listed below.
Recommended Resources
- Vogue Knitting (available on Amazon)
- The Knowledgeable Knitter by Margaret Radcliffe (available on Amazon)
- The Knitter’s Book of Finishing Techniques by Nancie Wiseman (available on Amazon)
- The Principles of Knitting by June Hemmons Hiatt (available on Amazon)
- “Crafting Cast Ons” by Mary Forte, Cast On (The Knitting Guild Association)
More Knitting Techniques
- How to Decrease in Knitting (6 Basic Techniques for Every Knitter)
- How to Increase in Knitting (Essential Increases for Every Knitter)
- The Basics of Slip-Stitch Knitting