
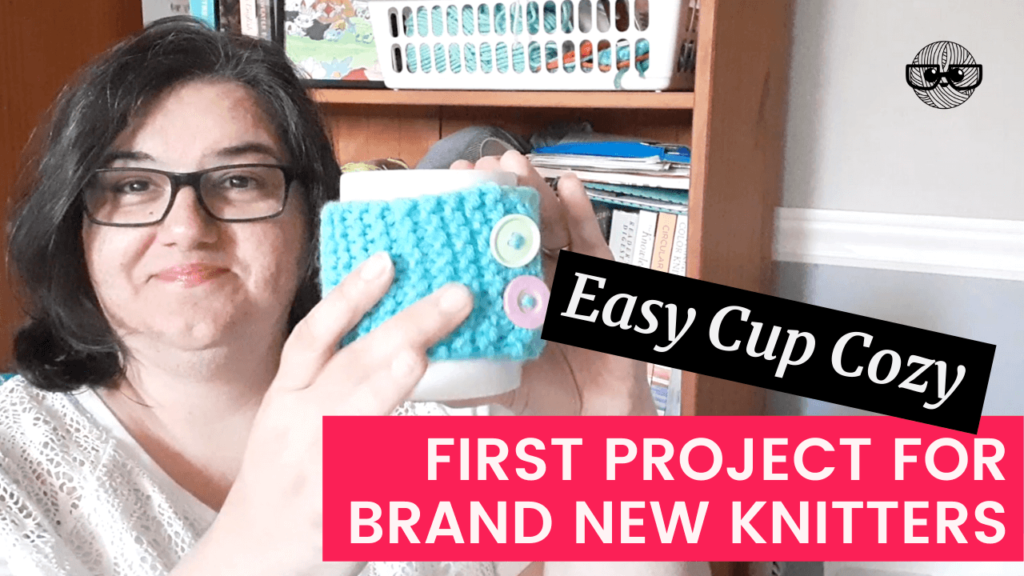
A knit cup cozy is a perfect project for a brand-new knitter. It’s easy to do and will show you all the basic things you need to know to start knitting right away. And a cup cozy makes a great gift that you can knit in less than an hour!
Here are the basic steps for knitting a cup cozy:
- Using bulky yarn, cast on 10 stitches.
- Knit every row until the piece measures 7.5 inches.
- Work two buttonholes.
- Knit one more row.
- Bind off.
- Attach two buttonholes.
- Weave in ends.
Those are the basic instructions but for more detailed information (especially if you’re a beginning knitter) keep reading. Learn exactly how to cast on, work the knit stitch, make buttonholes, and bind off. It’s really very easy – we’ll break down each step below – and there’s even a video tutorial to walk you through each step of the process. Let’s get knitting!
Knitting a Cup Cozy
A cup cozy is a great project that uses small amounts of yarn and knits up quickly which makes it great for new knitters and for those who want to knit a few quick gifts using their yarn stash. In each of the sections below we’ll look at the materials you’ll need, the gauge information, and the instructions. You’ll also find a video below that walks you through each step of the knitting process.
Fill out the form below to get a printable copy of the pattern. And be sure to check out the video tutorial below that will explain each part of the pattern and walk you through the cup cozy knitting process from start to finish.
Enter your email address below to get the FREE PATTERN.

You CAN be a confident knitter, but it starts with understanding what’s happening on your needles.
Materials
Here’s what you’ll need to complete this project:
- 25 yards of bulky weight yarn (like Paintbox Yarns Simply Chunky)
- US 10 [6 mm] knitting needles (like Knitter’s Pride Ginger DPNs)
- Tapestry needle
- 2 – 7/8″ buttons
Bulky yarn is chunkier in size so it makes learning to knit easier and is perfect for quick knit gifts. If you’re not quite sure what to look for, look for this symbol (courtesy of the Craft Yarn Council) on the yarn label:

Look for an acrylic or acrylic-wool blend – both of which will be stretchy but still elastic. Avoid plant-based yarns like cotton which aren’t very elastic and will droop and sag with use (not something you want on that hot cup of coffee!).
Along with a small amount of yarn (one ball will make a lot of cup cozies!), you’ll need knitting needles. Straight needles or double-pointed needles will both work well for this small project – just look for size 10 US (or 6 mm, depending on where you live). To finish the cup cozy you’ll also need a tapestry needle to weave in the yarn tails and two 7/8″ buttons.
Measurements
The finished measurements for the cup cozy are 3 inches wide by 8 inches long. This size should fit most mugs and cups. But, if you want a slightly larger cup cozy you’ll find instructions for that in the printable pattern. Eight inches might not seem wide enough – some large mugs can be as wide as ten inches around, but the fabric created by knitting every row (called Garter stitch) is very stretchy and will accommodate even very large mugs.
The pattern also includes gauge measurements: 13.5 sts and 25 rows in 4 inches. This isn’t so important for such a small project but it’s still useful information to have.
What is gauge? Gauge is the measurement information you’ll need to complete a project that has the same finished measurements as the project or garment in the pattern you’re using. If you have the same number of stitches and rows in your project that the designer had when creating the sample project, your project will have the same finished measurements. If you don’t have the same number of stitches or rows your project won’t be the same size. While it isn’t so important for a small project like a cup cozy, it’s very important for something like a sweater.
Tip: after you finish making your first cup cozy, get out a ruler, and measure to see if you have the same number of stitches and rows as listed in the pattern’s gauge information.
Abbreviations
Patterns are usually written with abbreviated instructions. If you’ve ever seen anything like “k2tog, yo, k3, yo, ssk” and been confused, you’re not the only one! Abbreviations were (and are) an important part of knitting – if patterns didn’t have abbreviated instructions they could get really long! This is especially important for magazines and small pattern booklets you’ll often find in craft stores – lots of instructions had to be written in small spaces – so abbreviations play an important role.
Thankfully, well-written patterns also include a section that explains those abbreviations. Here are the abbreviations you’ll find in the cup cozy pattern:
- BO – bind off
- CO – cast on
- patt – pattern
- k – knit
- k2tog – knit two stitches together as one stitch
- meas – measures
- yo – yarn over
Instructions
This cup cozy is worked flat, back-and-forth in rows. Two buttonholes are made at one end and buttons added to the other end. The Garter fabric (the fabric produced when you knit every row) is very stretchy so it can easily be fastened around any cup or mug.
Here are the written instructions. For a full tutorial, watch the video below or follow the photo tutorial that will show you exactly how to complete each step in the process.
- Using the knit cast on, cast on 10 stitches.
- Knit every row until the piece measures 7.5 inches from the cast-on edge.
- Work two buttonholes following these instructions: K2, k2tog, yo, k1, k2tog, yo, k3.
- Knit one more row.
- Bind off.
- Attach two buttons to the end opposite the buttonholes.
- Weave in ends and block to finished measurements.
![How to Knit a Cup Cozy [FREE PATTERN] Perfect Beginner Knitting Project!](https://toniaknits.com/wp-content/cache/flying-press/16e6e82c09f3f41a158ee0c9e3169cc9.jpg)
Cast on 10 stitches
Using the knit cast on, as demonstrated in the above video, cast on ten stitches. Here’s a quick description of the process:
- Make a slipknot and place it on one of your knitting needles.
- Holding the needle with the slipknot in your left hand and the empty needle in your right hand, insert the right needle underneath the left needle into the slipknot, wrap the yarn counter-clockwise around the right needle and pull the new cast-on stitch through the slipknot. See images 1-3 below.
- With the two needles parallel, place the new stitch on the left needle. See image 4 below.
- Insert the right needle beneath the left needle into the new stitch and repeat the process until you’ve cast on a total of 10 stitches (including the initial slipknot as one of the stitches.


Knit until the cup cozy measures 7.5″
The second instruction says: ‘Knit every row until the piece measures 7.5 inches from the cast-on edge.’
The knit stitch is formed just like the knit cast-on explained in the previous section. But, instead of placing the new stitch on the left needle, you drop the just worked stitch off the left needle.
See the above video for a complete walkthrough for creating the knit stitch or refer to the images below.
- Insert the right needle into the first loop on the left needle. See image 1 below.
- Wrap the yarn around the right needle counter-clockwise. See image 2 below.
- Pull the new stitch through, dropping the old stitch off the left needle. See images 3 & 4 below.


Make 2 Buttonholes
After the cup cozy has reached the desired measurements, it’s time to make two buttonholes. The instructions for working the buttonholes: ‘K2, k2tog, yo, k1, k2tog, yo, k3.’
Knit the first two stitches, knit the next two stitches together as one stitch (this creates a decrease of one stitch to the total stitch count – see the instructions below), wrap the yarn around the right needle to create a yarn over (this is an increase – which adds one stitch to the total stitch count – see the instructions below), knit one stitch, knit two stitches together as one stitch, wrap the yarn around the right needle to create a second yarn over, and knit three stitches.
The two yarn overs create small holes that are perfect little buttonholes for 7/8″ buttons.
How to K2tog
To work the K2tog decrease, knit two stitches together as one stitch.
- Insert the right needle into the first two stitches on the left needle. See image 1 below.
- Wrap the yarn to create a knit stitch, pull the new stitch through, and let the old stitches drop off the left needle. See images 2 & 3 below.


How to Yarn Over
Wrapping the yarn around the needle to create a Yarn Over increases the stitch count by one stitch.
- Bring the yarn to the front between the two needles.
- Bring the yarn up and over the right needle, moving it to the back again.


Finish the Cup Cozy
The final details for the cup cozy include binding off the last row of stitches, attaching two buttons, and weaving in the ends.
How to Bind Off
Binding off (or casting off) the stitches on the needle, secures the stitches and keeps everything from unraveling.
- Knit the first two stitches.
- Insert the left needle into the front leg of the first stitch on the right needle. See image 1 below.
- Lift this first stitch over the second stitch to bind off one stitch. See image 2 below.
- Knit another stitch and repeat the process.
- Continue binding off until the stitches have been worked.


The Final Details
Using the yarn from the project and a needle, thread some yarn through the needle and attach each button on the end opposite the buttonholes. Then use the needle to weave in all the ends (you’ll find details for these steps in the above video as well).
Once you’re done, you’ll have a cute little cup cozy. Cup cozies make great gifts – they are quick to knit, using up small bits of leftover yarn, and, since this pattern is so stretchy, it will fit around many different sized cups and mugs. So pick up a cute new mug and add a handmade cup cozy for a perfect, personalized gift.
Enter your email address below to get the FREE PATTERN.
You CAN be a confident knitter, but it starts with understanding what’s happening on your needles.
Is learning to knit easy?
Learning to knit is easy. It only takes a few simple steps to knit a stitch – insert your right needle into the stitch on your left needle, wrap the yarn around the right needle counterclockwise, pull the new stitch through, and drop the old stitch off the left needle.
What is the best thing to knit for a beginner?
New knitters should start with simple projects that will teach them the basics of knitting (casting on, the knit stitch, purl stitch, and binding off). Projects that are knit flat, back-and-forth in rows, are also a good idea. Look for things like dishcloths, coasters, and scarves – it’s always a good idea to actually have a finished object you can be proud of while you’re learning a new skill! See the list below for more project ideas that are perfect for brand-new knitters.
What does a beginner knitter need?
All you need to knit are knitting needles and yarn (here’s a list of recommendations for knitting needle brands). Other notions that are useful for brand-new knitters include tapestry needles for weaving in the tails on your finished projects, scissors, and a tape measure. As you gain new knitting skills you’ll want to add other accessories to your notions kit: stitch markers, stitch holders, a row counter, and a crochet hook are all useful items for new knitters (here’s a list of my favorite knitting tools and notions).
More Projects for New Knitters:
- Easy Scarf Knitting Pattern for New Knitters
- 10 Projects for Brand New Knitters
- Easy Dishcloth Patterns for Beginner Knitters (full video tutorial and 3 FREE patterns)