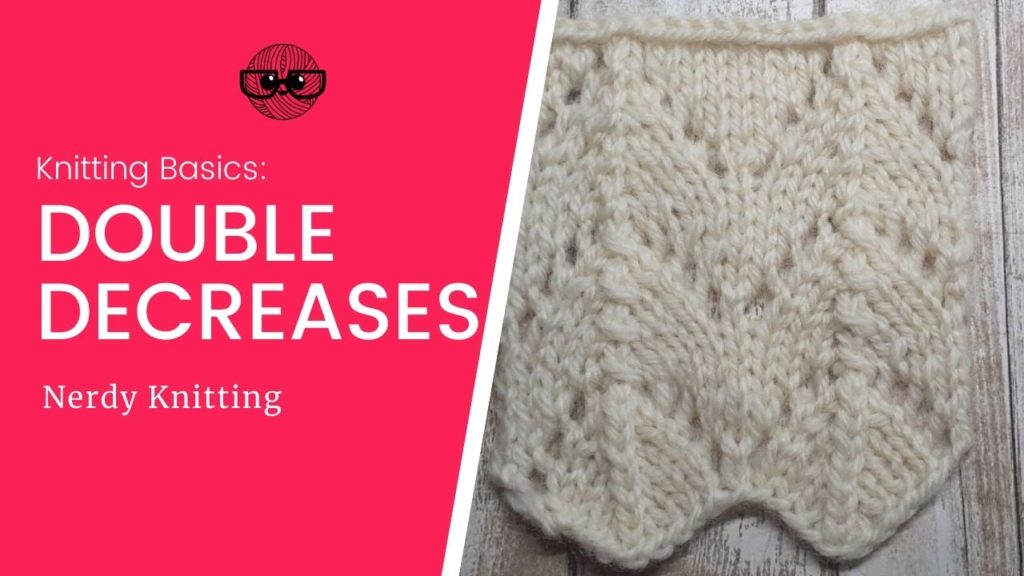
Double decreases are commonly used in many knitting patterns (especially lace). In its most basic terms, a double decrease removes two stitches from the stitch count of a particular row by taking three stitches and turning them into one stitch.
Sometimes these double decreases are paired – meaning one will slant in one direction while its partner will slant in the other. If you don’t want to use an increase that leans to the right or left there are also two options for working central decreases that don’t have an obvious slant.
Here are the double decrease methods explored in this article:
- K3tog & SSSK (common knitwise paired double decreases)
- P3tog & SSSP (common purlwise paired double decreases)
- K2SP & SK2P (alternative knitwise paired double decreases)
- SP2P & P2SP (alternative purlwise paired double decreases)
- S2KP & S2PP (centered double decreases)
In this article, we’ll take a look at each of these decrease methods and their partners.
Paired Double Decreases
While you may only need to use a single double decrease, there may be times they need to be paired – you may need to work two decreases and you want them to slant in opposite directions. The decreases below have been organized so that they are grouped with their ‘paired partner’.
The standard, basic methods for working double decreases in knitting are similar to the K2tog and SSK decreases – the K3tog & SSSK. The purl row equivalents (P2tog and SSP) also have a comparable double decrease – the P3tog and SSSP.
Along with these standard methods, there are also alternative methods (two each for knit rows and purl rows) that involve working two stitches together and slipping a third stitch over these two to create the double decrease.
Let’s look at each of these pairs – how they are worked and how they appear on the fabric.
K3tog & SSSK
If you’re familiar with the common single decrease stitches, K2tog and SSK, then their double decrease equivalents will be quite easy for you to learn since they are worked in exactly the same manner. The K3tog is worked just like a K2tog and the SSSK (which could be abbreviated S3K) is worked just like the SSK.
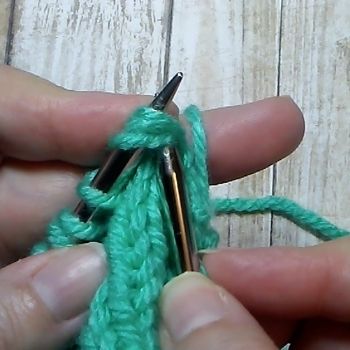
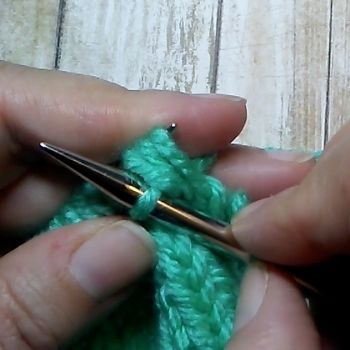
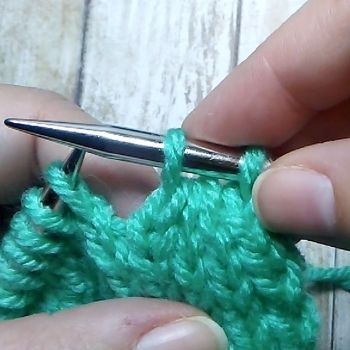
To work the K3tog:
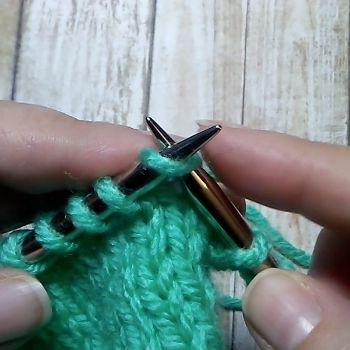
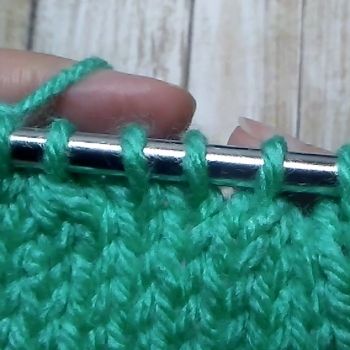
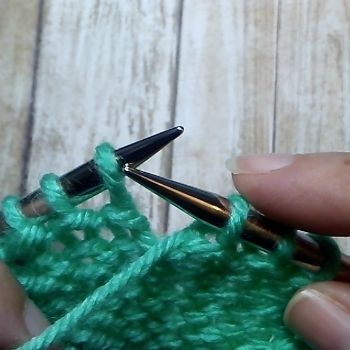
- Insert the right needle into the first three stitches on the left needle as if to knit. (Image 1)
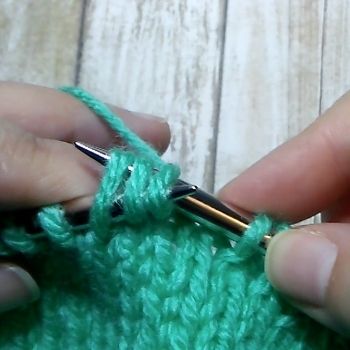
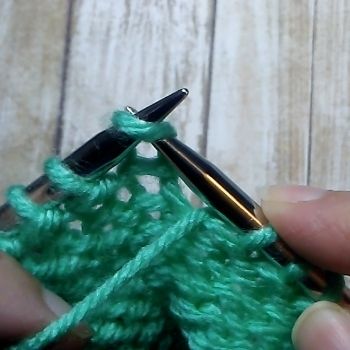
- Knit the three stitches together. (Image 2)
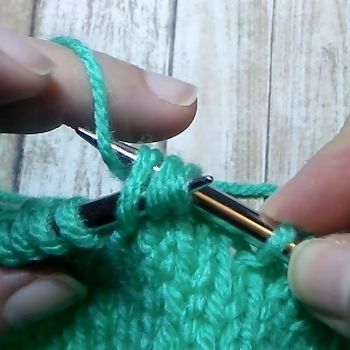
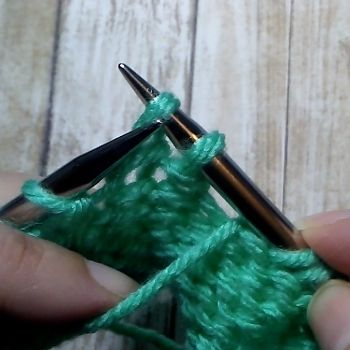
- The resulting decrease leans to the right. (Image 3)
To work the SSSK:
- Slip 3 stitches knitwise, one at a time, from the left needle to the right needle. (Image 1)
- Slip these 3 stitches back to the left needle purlwise, to maintain the stitch mount. (Image 2)
- Insert the right needle into the back legs of all three stitches and knit them together through the back legs. (Image 3)
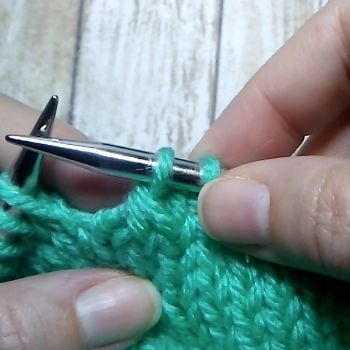
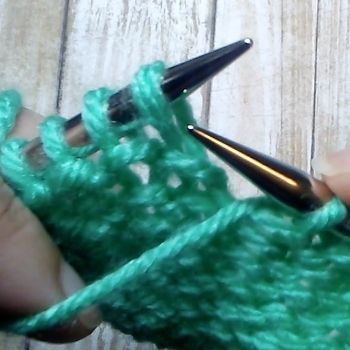
- The resulting decrease leans to the left. (Image 4)
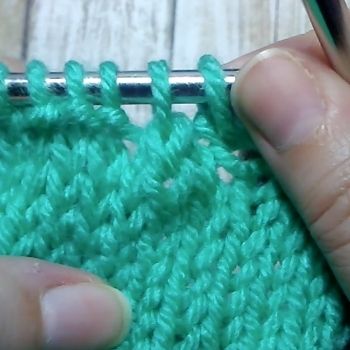
In the image below you can see how these two double decreases can be used in the same row as mirrored decreases. The SSSK leans to the left (the first stitch to the left) and the K3tog leans to the right (the first full stitch to the right).
P3tog & SSSP
The P3tog and SSSP (which could also be abbreviated S3P) are the purl row corresponding double decreases to the K3tog and SSSK. If you need to work double decreases on the wrong side of the work and the front of the work is Stockinette stitch or if you want to work a purl decrease in a primarily purl fabric, these are the decreases you’ll want to consider.
When worked on the wrong side of the work, they will have an obvious slant (like their cousins, the K3tog and SSSK). If reverse Stockinette or another heavily textured fabric is the right side of the work and the decreases are worked on the right side, the slant will be hidden in the purl textured fabric.
To work the P3tog:
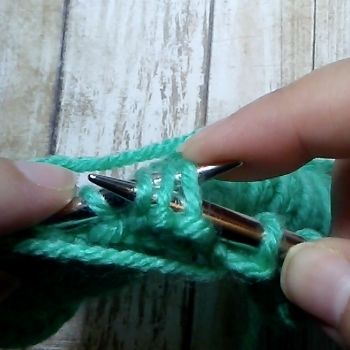
- With the yarn in front, insert the right needle into the first three stitches on the left needle as if to purl. (Image 1)
- Purl these three stitches together as one stitch. (Image 2)
To work the SSSP:
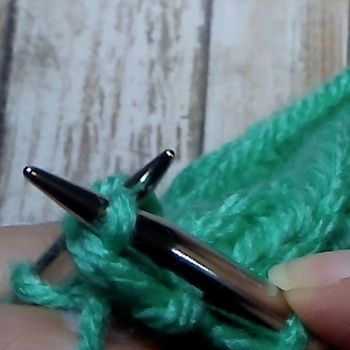
- With yarn in front, slip three stitches knitwise from the left needle to the right. (Image 1)
- Slip the three stitches back to the left needle purlwise, to maintain their new stitch mount.
- Insert the right needle into the back legs of the stitches, beginning with the third stitch and coming out from the first stitch. (Image 2)
- In this position, purl the three stitches together.
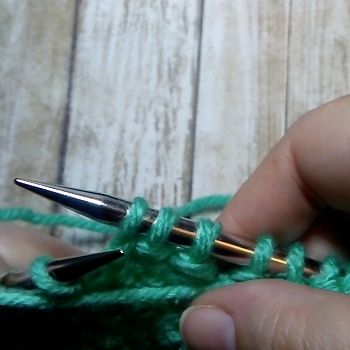
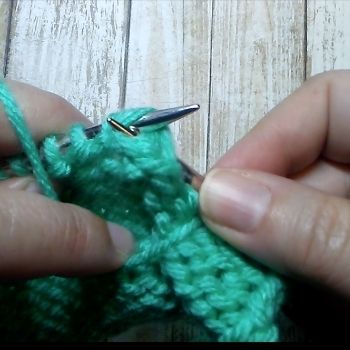
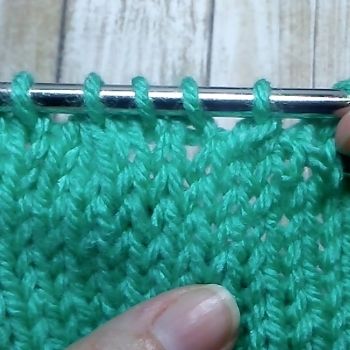
In the image below you can see how SSSP & P3tog double decreases can be used in the same row as paired decreases. While they are worked on the purl side of the work, the SSSP leans to the left (see the second stitch to the left in the image below) and the P3tog leans to the right (the first full stitch to the right).
More about decreasing: How to Decrease on a Purl Row in Knitting
Discover the Confidence You Need to Fix Your Knitting Mistakes

By the end of this six-part self-paced course, you’ll be able to read your knitting, recognize a variety of knitting mistakes, and understand how to fix them.
Slipped Double Decreases
While the double decreases explained above are commonly used, there are actually more ways to create double decreases. The next four methods all work two stitches together (either knitting or purling) and slipping the third stitch over this pair to create the double decrease. The stitch that is passed over creates the slant for the decrease.
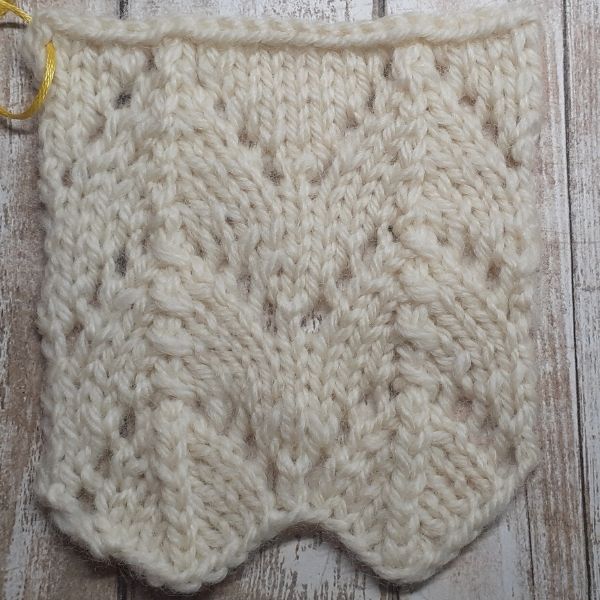
The lace swatch below shows two of these methods and the knitwise central decrease (look for the two central columns of stitches that run the length of the swatch). The first repeat of the pattern (at the bottom) uses the S2KP (a central decrease); the second pattern repeat (in the middle of the swatch) uses an SK2P which gives it a left-leaning slant, and the third pattern repeat (at the top of the swatch) uses the K2SP which produces a less obvious right-leaning slant.
K2SP & SK2P
The knit side versions of these slipped double decreases are abbreviated K2SP & SK2P. The SK2P may also be abbreviated ‘sl1-k2tog-psso’. Both double decreases involve knitting two stitches together. The third stitch in the grouping is passed over the single decrease to create a double decrease and gives the decrease it’s final directional slant.
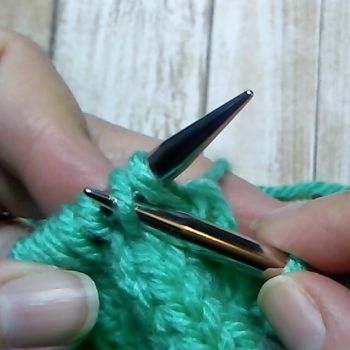
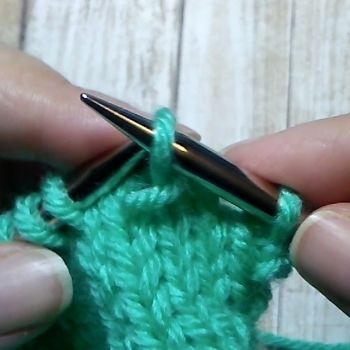
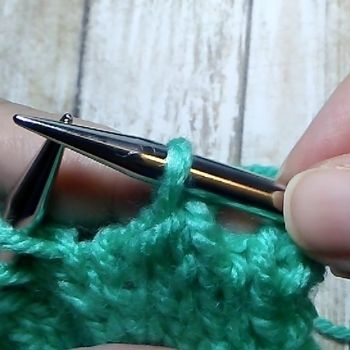
To work the K2SP:
- Knit to stitches together.
- Slip the resulting stitch back to the left needle, purlwise. (Image 1)
- Insert the right needle into the front leg of the second stitch on the left needle and slip it over the first stitch (Image 2) and off the left needle.
- Slip the completed stitch, purlwise, back to the right needle. (Image 3)
- The final image below demonstrates how that second stitch that is passed over the single decrease gives this stitch it’s right-leaning slant.
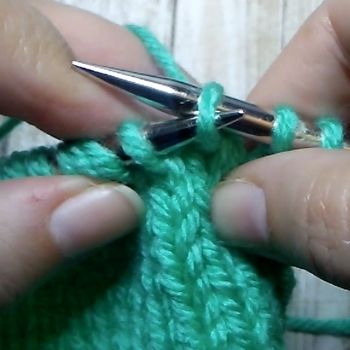
To work the SK2P:
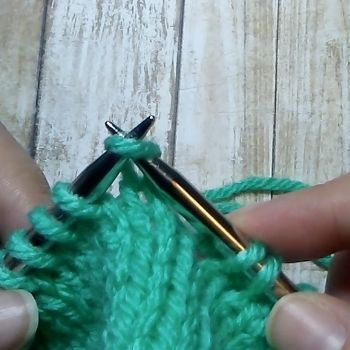
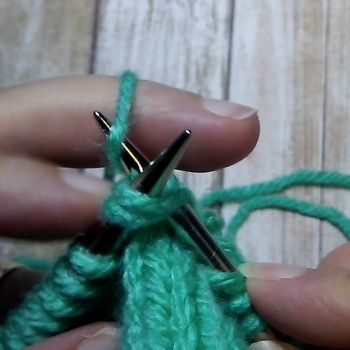
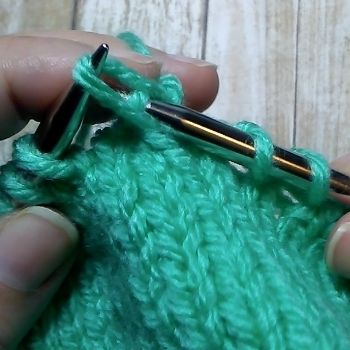
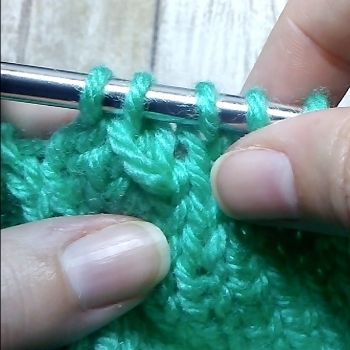
- Slip one stitch, knitwise, from the left needle to the right needle. (Image 1)
- Knit two stitches together. (Image 2)
- Insert the left needle into the leg of the second stitch on the right needle and pass it over the first stitch and off the right needle. (Image 3)
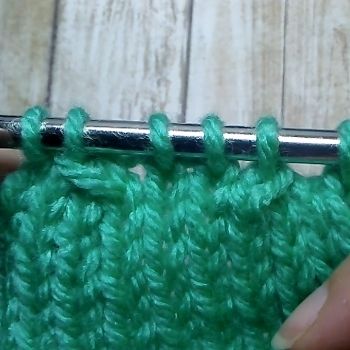
- The final image shows how passing that slipped stitch over the single decrease provides the left-leaning slant of the double decrease.
The image below demonstrates how the SK2P & K2SP double decreases can be used in the same row as mirrored decreases. The SK2P leans to the left (see the second stitch to the left in the image below) and the K2SP leans to the right (the first full stitch to the right).
SP2P & P2SP
While the SK2P & K2SP are the knit side (or Stockinette) versions of the Slipped Double Decreases, their purl row equivalents are abbreviated SP2P (which may also be abbreviated SP2) & P2SP. They both involve purling two stitches together. Like the knit versions, the third stitch in the grouping is passed over the single decrease to create a double decrease and gives the decrease it’s final directional slant.
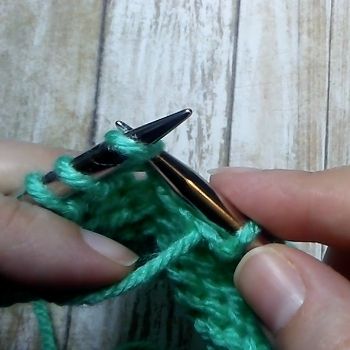
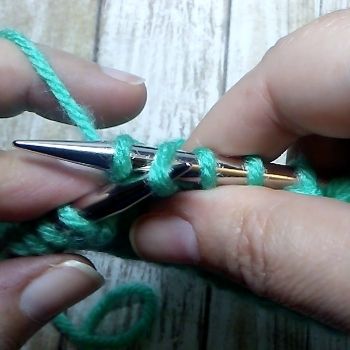
To work the SP2P:
- With yarn held to the front of the work, slip one stitch knitwise from the left needle to the right needle. (Image 1)
- Purl the next two stitches together. (Image 2)
- Insert the left needle into the front leg of the second stitch on the right needle, passing it over the first stitch and off the right needle. (Image 3)

To work the P2SP:
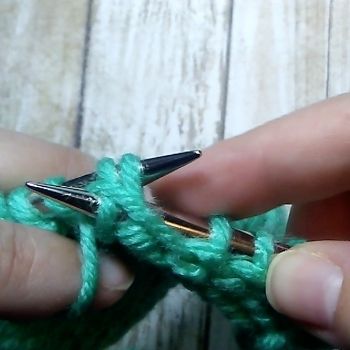
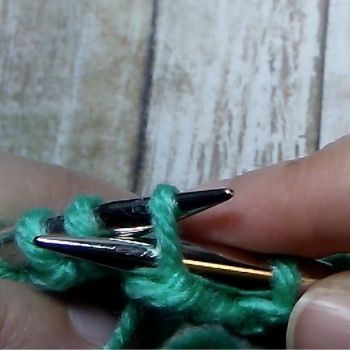
- Purl the first two stitches on the left needle together. (Image 1)
- Slip this stitch, purlwise, back to the left needle. (Image 2)
- Insert the right needle into the front leg of the second stitch on the left needle, passing it over the first stitch and off the left needle. (Image 3)
- Slip the completed double decrease stitch, purlwise, to the right needle. (Image 4)
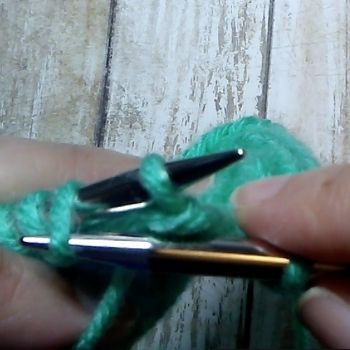
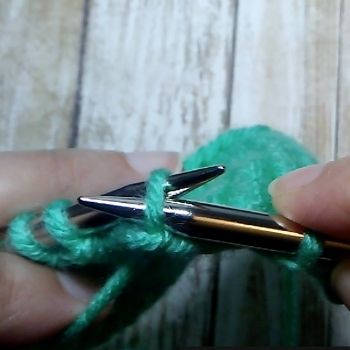
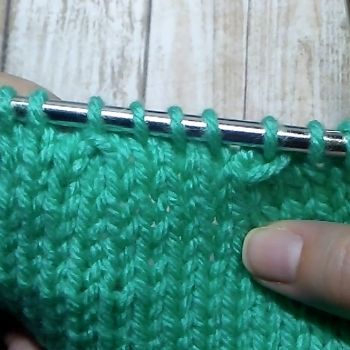
In the image below you can see how P2SP & SP2P double decreases can be used in the same row as mirrored decreases. While they are worked on the purl side of the work, the P2SP leans to the left (see the third stitch to the left in the image below) and the SP2P leans to the right (the second full stitch to the right).
Central Double Decreases
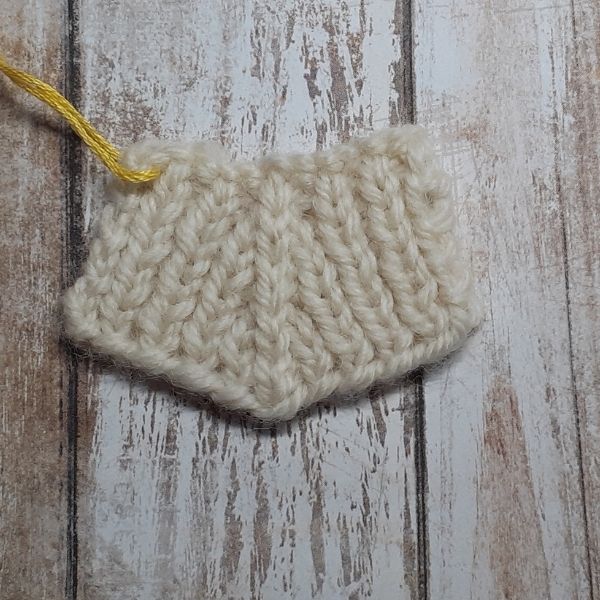
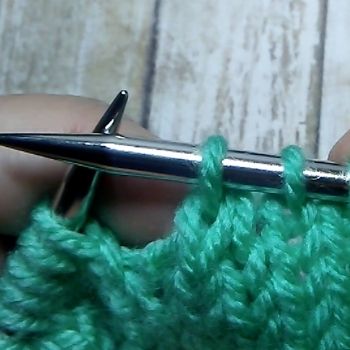
Centered (or central) double decreases have no obvious slant to the right or to the left. Instead, the center stitch remains on top, while the stitch to either side is hidden underneath.
This type of decrease is often used in lace designs where a slanted decrease isn’t desired (see the lace swatch at the beginning of this section). It’s also used as the central stitch in a V-neck sweater to clearly define the center of the neckband (as shown in the image below).
S2KP (Knitwise Central Decrease)
On the knit side of your fabric, the central decrease that is used is abbreviated S2KP (it may also be abbreviated as CDD or S2KP2). It may also be abbreviated as ‘sl2-k1-p2sso’ or referred to as a mitered double decrease. Like the other slipped double decreases, it involves slipping stitches. But this time, instead of working a single decrease and slipping the third stitch over, two stitches are slipped together as one stitch and only one stitch is worked before the two slipped stitches are passed over this one stitch.
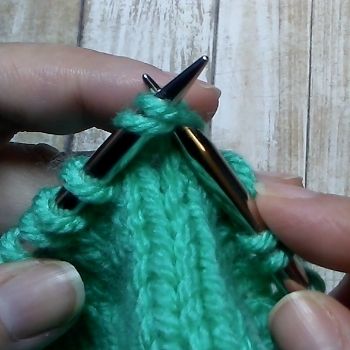
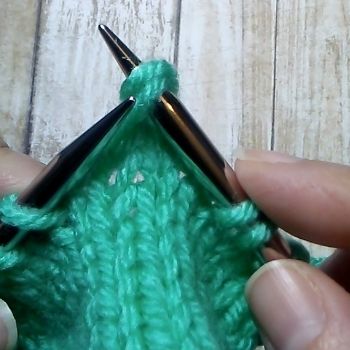
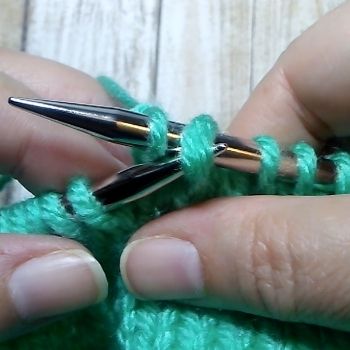
To work the S2KP:
- Insert the right needle into the first two stitches on the left needle as if to knit two together. (Image 1)
- From that position, slip the two stitches from the left needle to the right needle. (Image 2)
- Knit the next stitch on the left needle.
- Insert the left needle into the front legs of both the slipped stitches and pass them over the just knit stitch and off the right needle. (Image 3)
- The final image shows how the final decrease looks – the central stitch is prominent while a stitch is decreased at either side.
S2PP (Purlwise Central Decrease)
The S2PP central double decrease is the purl row equivalent to the double decrease explained above (it can also be abbreviated SSPP2). Like the S2KP, two stitches are slipped together as one stitch and only one stitch is worked before the two slipped stitches are passed over this one stitch.
But that is where the similarities end. This purl side equivalent involves many more steps to get the passed over stitches in their proper position to create the central decrease line. All these extra steps and stitch manipulation create a stitch that is more difficult to work and may appear messier (because of all that extra handling of the slipped stitches). Regardless, it may be useful to understand how this stitch is worked.
To work the S2PP:
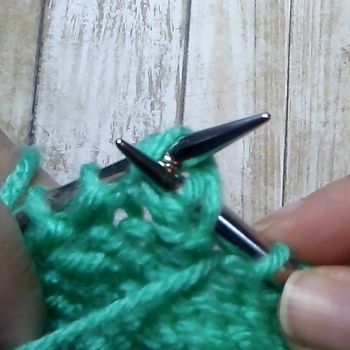
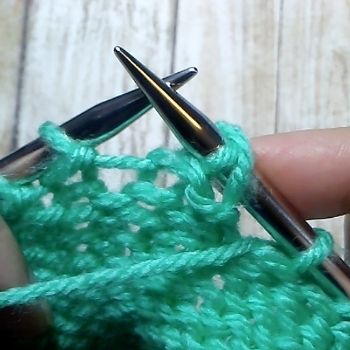
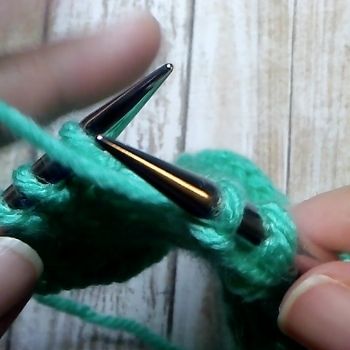
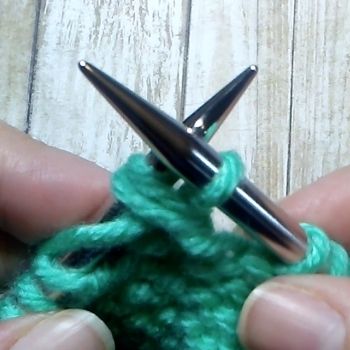
- With the yarn held to the front, slip two stitches knitwise, one at a time. (Images 1-3)
- Slip these two stitches back to the left needle, purlwise. (Image 4)
- Insert the right needle into the back legs of both stitches, as if to purl, inserting into the second stitch and then into the first. (Image 5)
- In this position, slip the stitches to the right needle. (Image 6)
- Purl the next stitch on the left needle. On the right needle, you now have a single purled stitch and two overlapping slipped stitches. (Image 7)
- Insert the left needle into the front legs of both overlapping slipped stitches and pass them over the single stitch and off the right needle. (Image 8)
- The final image shows how this decrease looks on the right side of the work.
Deciphering Double Decrease Abbreviations
While remembering how to work the K3tog and SSSK (and their purl row equivalents) is usually easy, one common trouble with the slipped and centered double decreases is the confusion between all the different abbreviations. All those combinations of numbers and S’s, K’s, and P’s are easy to mix up. But it’s possible to decipher what’s happening by looking at each letter and number in turn.
- If a number is included in an abbreviation, it’s simply telling you how many stitches are involved in the action that is abbreviated just before the number
- S = Slip
- P = Purl or Pass (pass the unworked slipped stitch over)
- K = Knit
Let’s take K2SP as an example. The ‘K2’ is letting us know how many stitches to knit. Since it’s a decrease we knit them together as one stitch. The ‘S’ tells us to slip. We haven’t yet slipped an unworked stitch from the left needle to the right so, by process of elimination we know that means our stitch has to be slipped (purlwise) back to the left needle. The final letter in our abbreviation, ‘P’, lets us know we can now pass a stitch over. Once we’ve done that, the only thing to do would be to slip the final stitch back to the right needle, now that it’s completed.
The other often confusing aspect is how exactly each stitch is slipped – either knitwise or purlwise. The final goal of each of these decreases is to remain untwisted so slipping properly is important to maintain that untwisted state. If you are slipping a stitch that is going to be passed over the other stitches, it should be slipped knitwise, to change the mount of the stitch. If you are moving an already worked stitch between the needles (like the K2SP example above), it should be slipped purlwise to maintain the mount of the stitch.
One final note, regarding the abbreviation ‘P’ for purl or pass – if it’s the first letter in the abbreviation it stands for purl, in all other instances it stands for pass (except the SSSP).
Once you understand how each individual letter works in the abbreviations and how to slip the stitches (knitwise or purlwise) you can begin to decipher how to work each of these decreases without having to open a reference book or check the key in your knitting pattern.
For more information on these techniques, take a look at the resources linked below (some links are affiliate links – if you click through and make a purchase I may receive a small commission at no extra cost to you. See the disclosure policy for more information).
Recommended Resources
- Vogue Knitting (available on Amazon)
- The Principles of Knitting by June Hemmons Hiatt (available on Amazon)
- Knitter’s Handbook by Montse Stanley (available on Amazon)
- Increase, Decrease by Judith Durant (available on Amazon)
- “Decreases Revisited, Part 2” by Binka Schwan (The Knitting Guild Association)
More Knitting Techniques
- How to Decrease on a Purl Row in Knitting
- How to Decrease in Knitting (6 Basic Techniques for Every Knitter)
- Knitting Twisted Decreases (everything you need to know)
