
While knitting patterns usually use decreases on the right side of the work, sometimes you might encounter a pattern that wants you to decrease on the wrong side of the work. There are a few different ways to decrease on a purl row in knitting but the most common is P2tog (purl two together).
To work a P2tog decrease, insert the right needle into the first two stitches on the left needle, as if to purl (from right to left). Wrap the yarn and create a new stitch, purling the two stitches together.
While a P2tog is useful, there are more ways to decrease on a purl row. We’ll look at those techniques below as well as advice on mirroring decreases, counting decrease rows, and more.
Decreasing on a Purl Row
The two most common purl decreases are P2tog and SSP (slip, slip, purl). These two single decreases (meaning they take two stitches and turn them into one – decreasing by a single stitch) are the purl side equivalents of the SSK and K2tog decreases that are most often used and mirror their slants (the SSP slants to the left and the P2tog slants to the right when viewed from the right side of the work).
While they are the most common, there are other methods for decreasing on purl rows – twisted versions of the SSP and P2tog, double decrease versions of those stitches (and two alternative double decrease methods), and there’s even a central decrease for purl rows – the S2pp (also known as the SSPP2).
All of these decreases can be used wherever you might need them – on wrong-side rows, when you need to work an increase in a purl stitch, or in reverse Stockinette (or other textured fabrics that involve many purl stitches). When used on the wrong side of the work for a Stockinette fabric on the right side, the decreases will have an obvious slant. If the decreases are worked with reverse Stockinette (or a stitch pattern with many purl stitches) as the right side fabric, the decreases have no obvious slant as they are hidden in the purl texture of the fabric.
Like working decreases on knit rows (or the right side of the work), a decrease stitch removes a stitch from the total stitch count for that particular row. Decreases are used for a variety of reasons, including:
- Used decoratively in lace patterns when paired with yarn overs
- For garment shaping (waist, armhole, necklines, etc)
- To create buttonholes
While decreases are most commonly worked on right-side rows, it’s good to know these alternate methods so you can work decreases on wrong-side rows (and the main fabric is Stockinette or predominantly knit stitches on the front of the work), work a decrease in a purl stitch (and you want it to be as unobtrusive as possible), or work a decrease in reverse Stockinette or another fabric where purl stitches are dominant and a knitwise decrease would be too obvious in the finished fabric.
For the sake of clarity, this article will assume that you are working decreases in reverse Stockinette, on the wrong side of the work (so the right side is Stockinette fabric).
Single Purl Decreases
The most common single purl row decreases are the Slip, Slip, Purl (abbreviated SSP) and the Purl Two Together (abbreviated P2tog). As stated above, these are the purlwise equivalents to the SSK and K2tog. Like those decreases, they also follow the slant of those decreases. The SSP slants to the left when viewed from the front of the work (like the SSK). The P2tog slants to the right when viewed from the front of the work (like the K2tog).
To work a P2tog:
- Insert the right needle into the first two stitches on the left needle as if to purl (from right to left). (Image 1 below)
- Wrap the yarn to purl and purl the two stitches together. (Images 2 & 3 below)
- The final image shows how the stitch on top leans off to the right when viewed from the right side of the work.


To work an SSP:
- Slip two stitches knitwise, one at a time. (Images 1 & 2 below)
- Slip these two stitches back to the left needle purlwise, to maintain their new stitch mount. (Image 3 below)
- Insert the right needle into the back legs of the stitches. (Image 4 below)
- Purl the two stitches together through those back legs. (Image 5 below)
- The final image below shows how the top stitch of the decrease slants to the left on the right side of the work.


For more details about these decreases, watch this video:
Discover the Confidence You Need to Fix Your Knitting Mistakes

By the end of this six-part self-paced course, you’ll be able to read your knitting, recognize a variety of knitting mistakes, and understand how to fix them.
Twisted Single Purl Decreases
The P2tog and SSP decreases can also be twisted. This is often used as a decorative technique and makes the decreases more obvious in the fabric. The stitches that are worked together to create the decrease are intentionally worked to twist the stitches. But this also changes the slant of the decrease. A regular P2tog leans to the right; a P2tog-tbl leans to the left. A standard SSP leans to the left; a Twisted SSP leans to the right.
To work the P2tog-tbl:
- Insert the right needle into the back legs of the first two stitches on the left needle, from left to right, inserting the needle into the second stitch and then into the first. (Image 1 below)
- Wrap the yarn and purl the two stitches together.
- The resulting decrease leans to the left but the stitches are twisted. (Image 2 below)


To work the Twisted SSP:
- Slip two stitches knitwise, one at a time, from the left needle to the right. (Image 1 below)
- Slip these two stitches back to the left needle (purlwise). (Image 2 below)
- Purl the two stitches together. (Image 3 below)
- The final decrease leans to the right but the stitches are twisted. (Image 4 below)


Double Purl Row Decreases
There are actually two different paired methods for creating double purl row decreases. The most common is the P3tog and the SSSP (which are worked exactly like the P2tog and SSP). An alternative set of paired decreases are the SP2 and the P2SP decreases.
All four of these decrease stitches are referred to as double decreases because they take three stitches and turn them into one (single decreases refer to turning two stitches into one – so you are ‘doubling’ the number of stitches that are decreased).
P3tog & SSSP
Once you understand how to work the basic P2tog and SSP decreases, turning them into double decreases is an easy task. The P2tog becomes the P3tog and the SSP becomes the SSSP (or it may be abbreviated S3P).
To work the P3tog:
- Insert the right needle into the first three stitches on the left needle as if to purl – from right to left. (Image 1 below)
- Wrap the yarn to purl and purl the stitches together. (Image 2 below)


To work the SSSP:
- Slip 3 stitches knitwise, one at a time, from the left needle to the right. (Image 1 below)
- Transfer these three stitches back to the left needle purlwise, to maintain their new stitch mount.
- Purl them together through the back legs of the stitches, inserting the right needle from left to right.


The image below shows how the P3tog and SSSP decreases look from the right side of the work. The SSSP (the second stitch from the left) leans to the left and the P3tog (the first stitch on the right) leans to the right.

SP2P & P2SP
While the P3tog and the SSSP are the most common purlwise double decreases, there is an alternative method for working paired purl row double decreases – the SP2P (a right-leaning purl double decrease, which can also be abbreviated SP2) and the P2SP (a left-leaning purl double decrease). Both of these involve purling two stitches together and passing a stitch over the single decrease to create a double decrease. Passing the stitch over the single decrease provides the final slant of the double decrease.
To work the SP2P:
- Slip the first stitch on the left needle knitwise to the right needle. (Image 1)
- Purl the next two stitches together. (Image 2)
- Insert the left needle into the front leg of the second stitch on the right needle and slip it over the first stitch and off the needle. (Image 3)


To work the P2SP:
- Purl two stitches together. (Image 1)
- Transfer the just created stitch to the left needle. (Image 2)
- Insert the right needle into the front leg of the second stitch on the left needle (Image 3) and lift it over the first stitch, dropping it off the left needle.
- Transfer the remaining stitch back to the right needle. (Image 4)


The image below shows how these decreases look on the right side of the work. The P2SP (the third stitch from the left) leans off to the left. The SP2P (the second stitch from the right) leans off to the right.

Central Purlwise Decrease
If you don’t want your double decrease to slant to the right or left and want what is called a ‘central’ (or centered) double decrease, where the center stitch sits on top and the stitches to the right and left are underneath – there is actually a purlwise method for that as well. It’s abbreviated – S2PP or SSPP2.
One warning, though – this method is much more involved than the knitwise version (the S2KP or CDD), which is simple to work and takes just a few steps. The purlwise version involves moving the stitches back and forth between the needles more often to get things mounted correctly for the final decrease.
To work the S2PP (or SSPP2):
- With the yarn held to the front of the work (facing you), slip two stitches knitwise, one at a time, from the left needle to the right needle. (Images 1-3 below)
- Slip these two stitches back to the left needle purlwise, maintaining the new stitch mount. (Image 4)
- Insert the right needle through the back legs of the stitches from left to right, into the second stitch, and then into the first (as if to purl them together through the back legs), slipping them to the right needle again. (Images 5 & 6)
- Purl the next stitch. Image 7 shows the right needle with these two stitches – the just purled stitch and the slipped stitches.
- Insert the left needle into the front legs of the slipped stitches and slip them over the purled stitch and off the right needle. (Image 8)
The final image below shows the final result of this decrease on the front of the work. The central stitch is on top with the stitches to the right and left underneath.


More Advice for Purl Row Decreases
Now that you understand how to work a variety of purl decreases (there are actually even more ways to decrease on a purl row than we’ve discussed here!), there are still a few more important details that are very useful: how to mirror your decreases (two different ways), how to count the rows between decrease rows (very important for garment shaping), and where to place your decreases in garments that will be seamed.
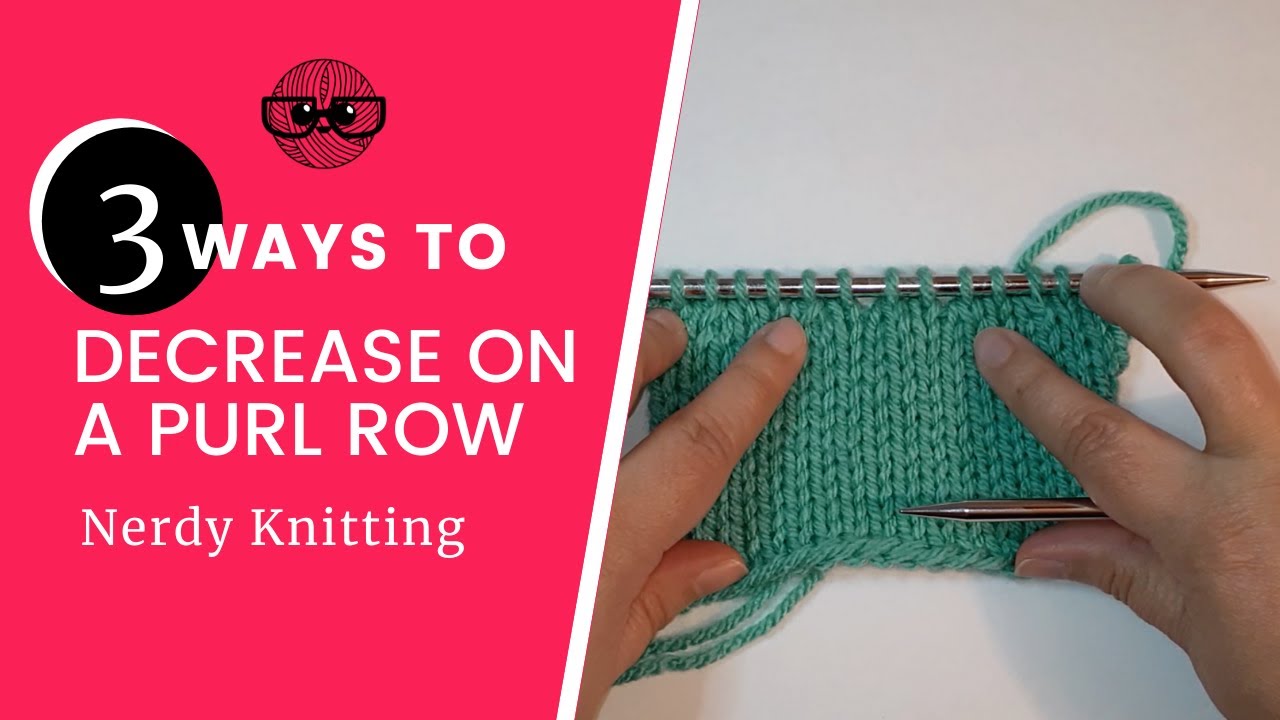
Mirrored Decreases
Decreases are often used to shape garments and, in that case, they are often mirrored. That means two decreases are worked on the same row that ‘mirror’ each other. For example, if you work a left-slanting decrease at the right edge, you would want to pair it with a right-slanting decrease at the left edge, working them both in the same locations at their respective edges. If you work your first decrease three stitches from the edge, you would want to ensure that the mirrored decrease is placed three stitches in from the opposite edge.
When the slant of the decrease follows the slant of the shaping along the edge, that’s referred to as a ‘blended decrease’ because the shaping of the fabric and the slant of the decrease move in the same direction (the image below shows blended decreases).
Alternatively, you can have decreases that lean towards the shaped edge in opposing directions. For example, a k2tog (a right-slanting decrease) might be worked along the right edge, where the fabric is slanting to the left. This is often called ‘full-fashioned’ shaping (because of it’s similarity to manufactured machine-knit garments).
In the swatch below, a P2tog was worked along the left edge (to follow the right slant of the edge) and an SSP was worked along the right edge (to follow the left slant of the edge), creating mirrored decreases that blend with the shaping of the swatch. These decreases were worked on the wrong side of the work.

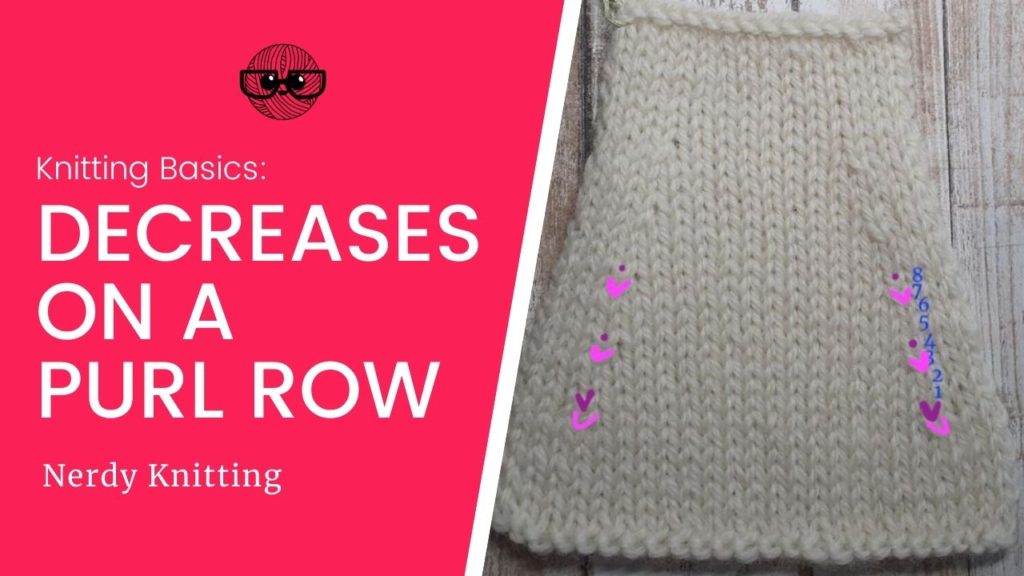
Counting Decrease Rows
Counting rows while working decreases (for waist shaping, as an example) is an important part of understanding how to work them at set intervals. For example, a pattern might instruct you to decrease every other row, every fourth row, or every sixth row. So it’s important to know how to identify the decreases and accurately count the rows worked between each one.
There are two things you actually have to pay attention to – the stitches that are decreased and the row they were decreased (which aren’t the same thing).
In the image below, the stitches that are decreased are highlighted in the lighter pink. The rows those decreases are actually worked, though, is the row above – the darker pink/mauve colored V’s and dots.

When you are counting the rows that you work straight before working another decrease, you count from the point the decreases are worked (and not from the point of the stitches that are decreased).
In the picture above, the decreases were worked every fourth row. The first decrease is worked and then three plain rows are worked before another decrease row (the fourth row).
You can use this same information to decrease whenever a pattern tells you to decrease on every following row (which is also the same as – (1) every right side row (2) every two rows or (3) every second row), every fourth row (which might be written as ‘every alternating right side row’), or even every sixth or eighth row.
Where to Place Decreases (for Seaming & Picking up Stitches)
Sometimes a pattern will instruct you to work a decrease at the beginning and end of the row (and every following right side row or every fourth row, etc) without providing any further instructions on how or exactly where they should be placed. It’s often left up to the discretion of the knitter (especially in older patterns). But there’s no reason to be concerned. Now that you know how to work your decreases, you can choose the most suitable decrease for the job and then decide where to place them. This placement is most crucial in hand-knit garments that are knit in pieces and then seamed together.
Decrease stitches that are used in garments that will be seamed are best when they are worked one or two stitches in from the edge. If they are worked right along the edge, it makes seaming the finished garment more difficult and may adversely affect the final look of the seam. Instead, move the decrease stitches into the garment by one (or even two) stitches. They will still be along the edge so will remain fairly inconspicuous and they won’t interfere when seaming the garment pieces together.
The same rule also applies for edges where stitches will need to be picked up (like the neckline of a sweater). Don’t place the decreases right along the edge, move them in a stitch (or two) to allow for a neater finished neckband.
Once you understand how to work these purl row decreases, you’ll have more useful techniques in your knitting toolbox, ready to pull out whenever you might need them. For more information on these techniques, take a look at the resources linked below (some links are affiliate links – if you click through and make a purchase I may receive a small commission at no extra cost to you. See the disclosure policy for more information).
Recommended Resources
- Vogue Knitting (available on Amazon)
- The Principles of Knitting by June Hemmons Hiatt (available on Amazon)
- Knitter’s Handbook by Montse Stanley (available on Amazon)
- Increase, Decrease by Judith Durant (available on Amazon)
- “Decreases Revisited, Part 2” by Binka Schwan (The Knitting Guild Association)
More Knitting Techniques
- Four Ways to Increase on a Purl Row
- How to Decrease in Knitting (6 Basic Techniques for Every Knitter)
- Knitting Twisted Decreases (everything you need to know)