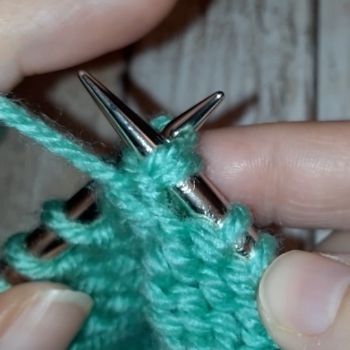
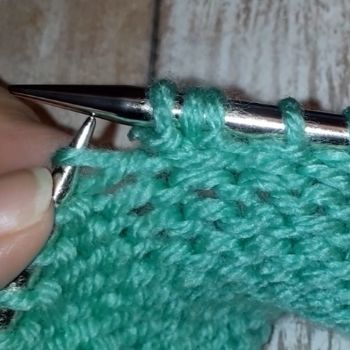
Double increases aren’t as commonly used as basic single increases but they are useful and will come in handy, especially when you need to increase many stitches. They are most often found in lace stitch patterns, so if you enjoy knitting lace patterns, double increases are something you’ll want to be familiar with.
Double increases can be worked in many ways but each method can be divided into one of two categories. They can either take one stitch and turn it into three stitches or they can be worked between stitches. Both methods increase the stitch count of a particular row by two stitches.
Double increases are usually worked on right side rows, especially when worked in Stockinette fabric but they can also be worked on wrong side rows or in purl stitches as you’ll see demonstrated below.
Here are the double increase methods explored in this article:
- Double Yarn Overs
- Knit-Purl-Knit
- Knit-YO-Knit
- Knit Front-Back-Front
- Central Double Increase
- Purl-Knit-Purl
- Purl-YO-Purl
- Purl Front-Back-Front
In this article, we’ll take a look at each of these double increase methods (you can use the Table of Contents links in the box below to jump directly to a particular double increase method).
How Double Increases are Worked
Double increases can be worked in a number of different ways. Besides the double yarn over method described in the next section, the other seven methods can be divided into three categories:
- knit and purl into the same stitch
- knit or purl into the front and back of the same stitch
- adding yarn overs between knit or purl stitches
Beyond these methods, it’s also possible to create a double increase simply by working two single increases side by side. For example, you could work a Right Lifted Increase and then work a Left Lifted Increase directly after. Or you could work a Make One Right, knit one stitch, then work a Make One Left. While both methods use single decreases, working them in stitches that are side by side creates another method for working a double decrease.
Learn more about Single Increases in this article: How to Increase in Knitting (Essential Increases for Every Knitter)
Double Yarn Overs
Double yarn overs can be worked on either right side or wrong side rows. The resulting yarn overs are both worked according to the pattern on the next row. For example, if you create the double yarn overs on the right side of the work and you’re working in Stockinette, then the yarn overs will both be purled on the next row.
And, while the remaining double increases are worked into a particular stitch, double yarn overs are worked between stitches.
To work double yarn overs:
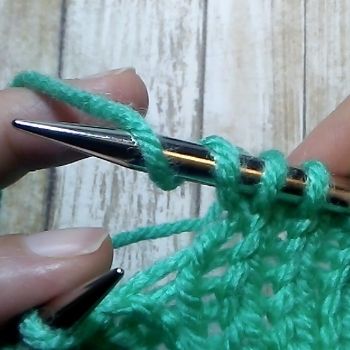
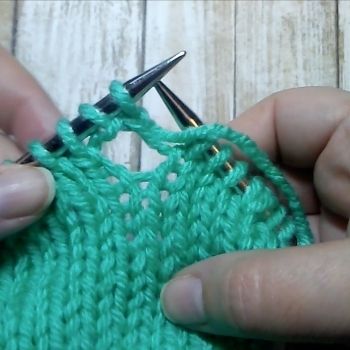
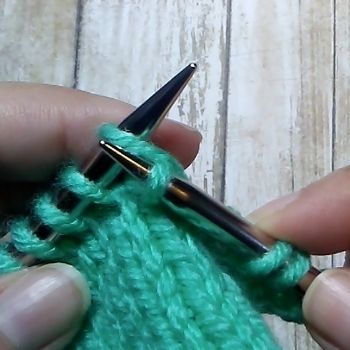
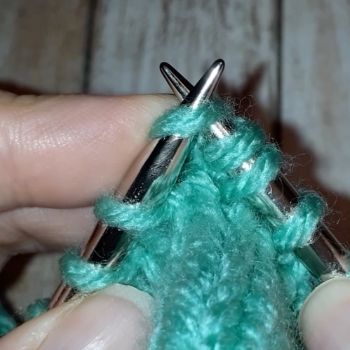
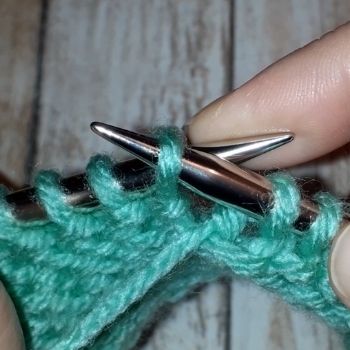
Bring the yarn to the front between the needles, moving it up and over the right needle. Repeat the first step for the second yarn over. (Image 1 below)
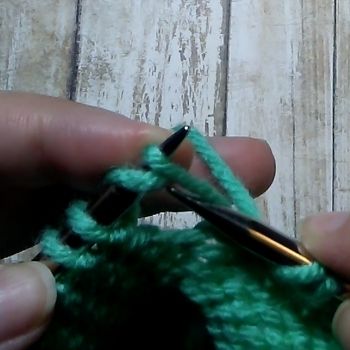
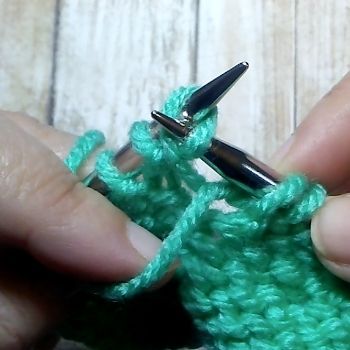
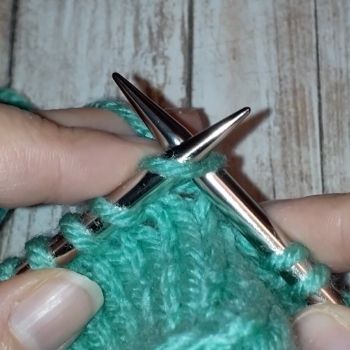
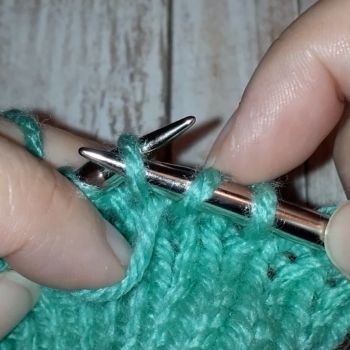
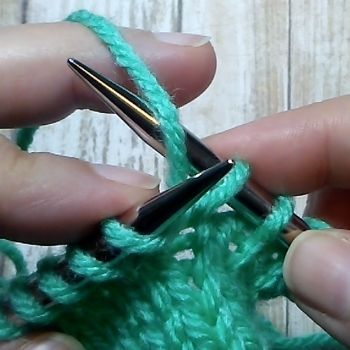
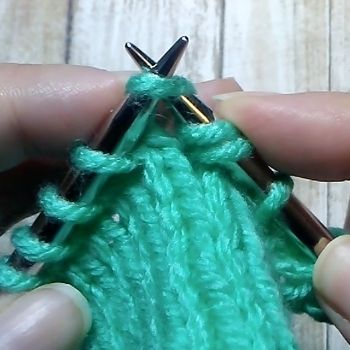
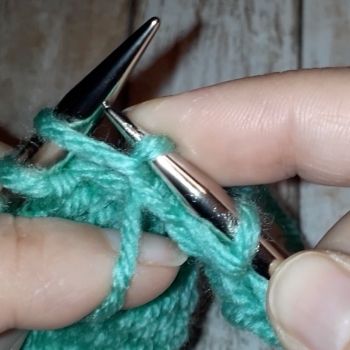
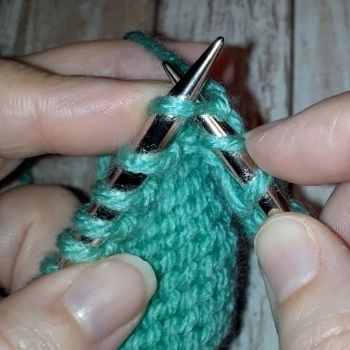
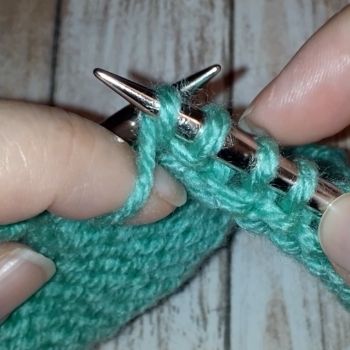
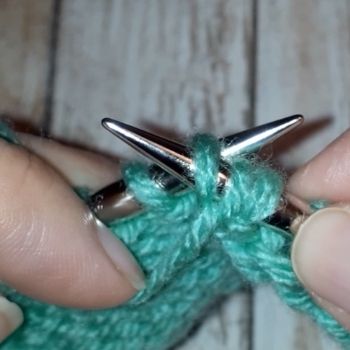
On the next row, work each yarn over as an individual stitch, either knitting or purling the yarn over, as the pattern requires. Images 2 & 3 below demonstrate one method – knitting the first yarn over and purling the second yarn over through the back leg.
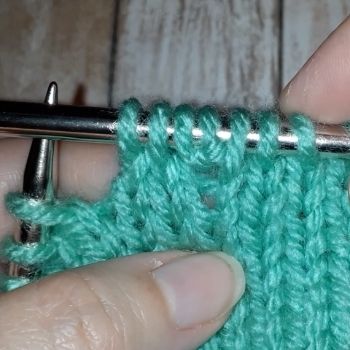
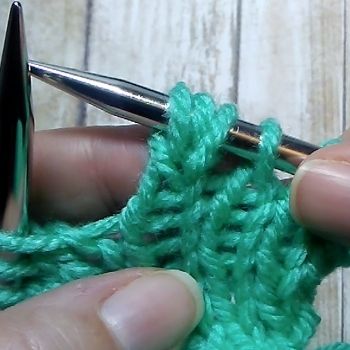
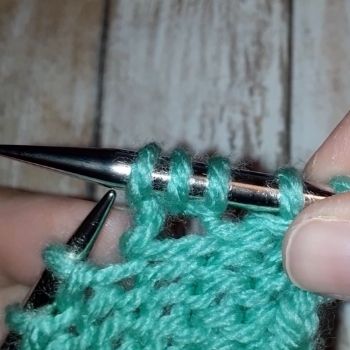
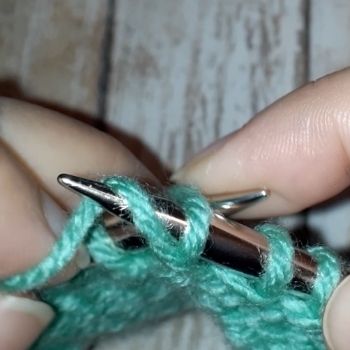
The final image shows how this looks from the right side of the work – the double yarn over creates a large hole and increases the stitch count by two stitches.
Knit Row Double Increases
Double increases worked on knit rows start with a knit stitch. The selected stitch is worked three times – once for the original stitch and then twice more to increase the stitch count by two.
Knit-Purl-Knit
The first method for increasing twice is the ‘Knit-Purl-Knit’ and it’s worked exactly as it sounds:
- Insert the right needle into the first stitch on the left needle as if to knit. (Image 1 below)
- Wrap the yarn and create a knit stitch, but don’t drop the just worked stitch off the needle.
- Instead, bring the working yarn to the front of the work and insert the right needle into that stitch as if to purl. (Image 2 below)
- Purl the stitch but keep the now twice-worked stitch on the left needle.
- Insert the right needle into the stitch on the left needle as if to knit and work another knit stitch, removing the worked stitch from the left needle. (Image 3 below)
- The final image below shows how this type of double increase stitch looks.
Knit-YO-Knit
The ‘Knit-YO-Knit’ (which may be abbreviated ‘K-YO-K’) double increase is another option that is easier to work than the increase described above. It can also be used to increase by even more stitches simply by adding another ‘yarn over-knit’ (to increase up to 6 extra stitches). This increase leaves a small hole at the base of the increase.
To work the Knit-YO-Knit:
- Insert the right needle into the first stitch on the left needle as if to knit and work a knit stitch. (Image 1 below)
- Keeping the just worked stitch on the left needle, wrap the working yarn around the right needle to create a yarn over, bringing the yarn to the front and moving it up and over the needle. (Image 2 below)
- Insert the right needle back into the first stitch on the left needle and knit the stitch again, letting the just worked stitch fall off the left needle. (Image 3 below)
- The final image below shows how this double increase looks. When you come to it on the next row, each stitch should be worked as a normal stitch.
Knit Front-Back-Front (KFBF)
The third double increase method that is commonly used in knit stitches is the ‘Knit Front-Back-Front’ (commonly abbreviated KFBF). If you are familiar with the KFB increase, this is the same increase method with one additional step. And, like the KFB, the increase also leaves a small hole underneath the increase.
To work the KFBF:
- Insert the right needle into the first stitch on the left needle as if to knit and knit the stitch, keeping the stitch on the left needle. (Image 1 below)
- Now insert the right needle into the back leg of the same stitch and knit through this back leg. (Image 2 below)
- Return the right needle to the front leg of the stitch on the left needle and knit one more stitch before letting the worked stitch fall off the left needle. (Image 3 below)
- The final image below shows how this increase looks (the two stitches that are increased have small bars beneath the just created stitches). It also creates a small hole beneath the two additional stitches.
Central Double Increase
The Central Double Increase (which may be abbreviated CDI) is another method that uses the KFB increase with a slight change. Barbara Walker describes this increase in her Third Treasury of Knitting Patterns and also uses it in some of her lace stitch patterns. It creates an increase that doesn’t slant to the right or to the left but instead, appears to come from one central point. It also doesn’t create a hole underneath the increase (while the others mentioned above have a tendency to have a small hole at the place the increase was created).
To work the Central Double Increase:
- Insert the right needle into the back leg of the first stitch on the left needle as if to knit and knit the stitch from that position, leaving the stitch on the left needle.
- Now knit into the front leg of the stitch on the left needle and let the stitch drop off the left needle.
- Using the left needle tip, locate the running bar between the two new stitches and lift it onto the left needle (inserting from left to right). Knit into the back leg of this running bar.
Purl Row Double Increases
While the knit versions of the double increases are probably most common, the first three have purl row equivalents that can be worked on wrong side rows or when you want to increase in a purl stitch. And, like their knit row counterparts, they have a tendency to create a small hole at the base of the increase.
Purl-Knit-Purl
The ‘Purl-Knit-Purl’ is worked just like the ‘Knit-Purl-Knit’ in reverse. One stitch is worked three times – purling, knitting, then purling again in the same stitch.
How to work the Purl-Knit-Purl
- With the yarn held to the front of the work, insert the right needle into the first stitch on the left needle as if to purl and purl the stitch, leaving the just worked stitch on the left needle. (Image 1 below)
- Move the working yarn to the back of the work and insert the right needle into the stitch on the left needle as if to knit and create a new knit stitch, leaving the just worked stitch on the left needle. (Image 2 below)
- Bring the working yarn to the front of the work again and purl the stitch one more time before finally letting the worked stitch fall off the left needle. (Image 3 below)
- The last image shows how this double decrease looks.
Purl-YO-Purl
The ‘Purl-YO-Purl’ (which may be abbreviated ‘P-YO-P’) is a simpler double increase to work and is worked in a similar manner to the ‘K-YO-K’. Like the knit row equivalent, you can also increase by multiples of two by including more ‘yarnover-purls’ to the increase.
To work the Purl-YO-Purl:
- With the working yarn held to the front, insert the right needle into the first stitch on the left needle as if to purl. Work a purl stitch, keeping the just worked stitch on the left needle. (Image 1 below)
- Create a yarn over on the right needle, bringing the yarn up and over the needle and back to the front again. (Image 2 below)
- Work a second purl stitch into the stitch on the left needle before finally letting the worked stitch fall off the left needle. (Image 3 below)
- The last image below shows how this double increase looks.
Purl Front-Back-Front (PFBF)
The ‘Purl Front-Back-Front’ (commonly abbreviated PFBF) is the purl row equivalent of the KFBF and is worked in a similar manner. If you are familiar with the PFB increase, this is worked in the same manner with one additional step.
To work the PFBF:
- With the working yarn held to the front of the work, insert the right needle into the first stitch on the left needle as if to purl. Work a purl stitch but keep the just worked stitch on the left needle. (Image 1 below)
- Insert the right needle into the back leg of the stitch, as if to purl through the back leg – inserting the needle from left to right – and work another purl stitch but keeping the just worked stitch on the left needle. (Image 2 below)
- Bring the right needle back to the front and insert into the front of the stitch and work one more purl stitch before letting the worked stitch fall off the left needle. (Image 3 below)
- The last image shows how this double increase looks.
There are more ways you can increase multiple times but these eight methods are a good starting point and would be useful for almost all situations. You could use any of these increases when a pattern requires you to work a double increase (sometimes you’ll see pattern instructions ‘INCTO3’ which means increase to three stitches). If you want to explore these double increase methods use the recommended resources listed below to get you started.
Recommended Resources
- Vogue Knitting (available on Amazon)
- The Principles of Knitting by June Hemmons Hiatt (available on Amazon)
- Increase, Decrease by Judith Durant (available on Amazon)
- “Double Increases” by Binka Schwan, Cast On (The Knitting Guild Association)
- “Central Double Increases” by Binka Schawn, Cast On (The Knitting Guild Association)
More Knitting Techniques
- How to Increase in Knitting (Essential Increases for Every Knitter)
- Four Ways to Increase on a Purl Row
- How to Decrease in Knitting (6 Basic Techniques for Every Knitter)
